Downloading and installing custom content can be confusing. That’s why we’re here to help!
Updated May 2023
Hey all! It’s Paige with a new guide here on the TSR blog. Follow this guide to learn how to download and install The Sims 4 Custom Content (or CC) on both Windows and Mac computers using The Sims Resource as well as how to install the game using the Epic Games launcher!
Epic Games Launcher
Please note: The Sims Resource is not affiliated or part of EA or Epic Games. This guide is meant to inform and educate. If any issues with the game or launchers arise, please reach out to EA or Epic.
The process for installing Sims 4 and mods using the Epic Games launcher is similar to the earlier methods, but takes a bit more work up front. This launcher is a storefront for games available online, and is a free download. You will need to make an Epic Games account in order to download games on this launcher.

First, you’ll have to search for ‘The Sims 4’ to find the game.

Once you do that, you can add the game to your library. At the time of posting this (May 2023), the game is free on this launcher.

Once you’ve clicked ‘get’ and added the game to your library, you’ll choose to install the game. At this point you will be asked to link your Epic Games account to your EA account. This requires logging in to both accounts, and installing the EA desktop app if you don’t already have it.

Once you’ve linked the apps, the EA desktop app will launch for the game to install. A note will appear saying that the base game is being accessed via the Epic Games launcher – this means when you want to play the game, both launchers will have to open in order for the game to run.

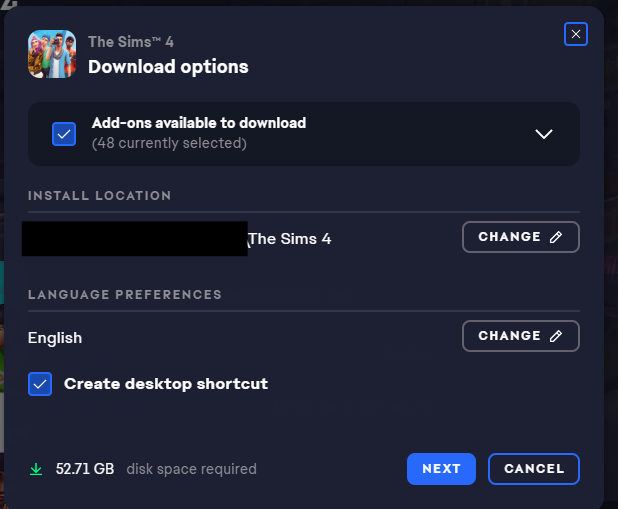
When you start downloading the game, you will be able to download any add-on content like expansions or game packs that you own via EA as well as the Epic Games base game or owned packs. You will also be able to choose where you want the game files to go on your computer.
Once you’ve installed the game, you’ll be able to install mods using the instructions in the following sections of this blog! Happy Simming!
Installing CC On Windows PCs
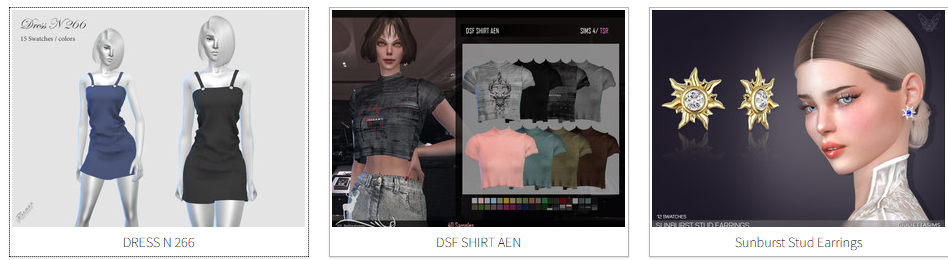
First, you’ll want to find a piece of custom content you want to add to your game! I’m downloading Dress N 266 by Pizazz here on The Sims Resource.
As you can see in the piece’s description, this CC is a “new mesh”–that means you won’t have to download any other content in order for it to work in your game. Be sure to check for mesh details on each piece of CC you download so you know your downloads will be glitch-free!

Since I’m using my free The Sims Resource account, I have to wait 10 seconds for the item to download–if I were a VIP member, it would download instantly!
 When a window asks if you want to “save” or “open” the file, make sure to “save” it. As you can see, the file I downloaded is in the .package format, which means it can go directly into my mods folder. If it’s in a zip file or .rar file, it has to be extracted first using a software like 7zip or WinZip before you can place it in your game.

Once the file is saved, I find it in my downloads folder.
 Once I locate it, I move the file to this location: This PC > Documents > Electronic Arts > The Sims 4 > Mods. Now the mod can be used in your game!
 Here’s how the mod appears in my Create-A-Sim catalog. The little wrench icon denotes that it’s custom content and not content that comes with the game.
 Here’s the dress on my Sim! She’s already looking more stylish.

Installing CC On Macs
The CC install process on Macs starts pretty similarly to PCs–find a piece of CC you like and download it. For this tutorial, I’ll be downloading Clothing 202108 created by Arltos on The Sims Resource.

I then download the piece via the download button after making sure that this piece of CC is a “new mesh”–as I said earlier, this means that you won’t need to download anything else in order for the CC to work in your game.

Since I’m currently using a free account, I then wait 10 seconds for my download (which I wouldn’t do with VIP The Sims Resource membership).

Be sure to “save” the file instead of trying to open it!

Once I locate the file in my downloads folder, I move it to the folder found through this path: Macintosh HD > Users > [Your Username] > Documents > Electronic Arts > The Sims 4.
 Now that I’m in my Sims 4 folder, I navigate to the folder called “Mods” and drop my downloaded file in there. Do not touch the file called “Resource.cfg”–that’s an important file that allows your mods to work properly in game.
 Once the file is in my mods folder, I can now access the piece of CC in my game. This is the piece as it appears in my Create-A-Sim catalog. Now I can put it on my Sims!
 Here’s my Sim wearing the CC I just installed!

Mod Organizing
Once your mods are in your mods folder, you can organize them in any way you want to keep track of them. I personally suggest organizing by “date downloaded” in case there are any issues with conflicting mods in the future.

Within these folders, I organize by CC type, like clothes, hairs, and shoes–you can go up to four folders deep with your CC still functioning properly! Here I’m showcasing the organization process on my Windows PC, but it works the same on Macs.


If you want to get really organized with your CC, VIP The Sims Resource members have access to the CC Manager tool, which allows you to both install, manage, and disable all of your Sims 3 and 4 CC, as you can see below.

There are lots of ways to organize your CC, so feel free to try a few systems to see what works best for you.
Thanks for reading! Hopefully your CC downloading and installing journey is smooth sailing with the help of this guide 🙂