
A lot of people were getting confused about how to create winding stairs that I made. In this tutorial, I will go over how I created the winding stairs in The Sims 3. As a bonus, you will able to see how I placed the ceiling trims for the various heights of the winding stairs.
Create Winding Stairs
FIRST OF ALL OPEN UP THE CHEATWINDOW (CTRL + C) AND TYPE: CONSTRAINFLOORELEVATION FALSE (ENTER)
Go go to the build section, Roofs, and Turn OFF the autoroof.
Next, go to the stairs, pick any stair and on ground level, move it down. This will result in a 4-step stair moving down into the ground like so:
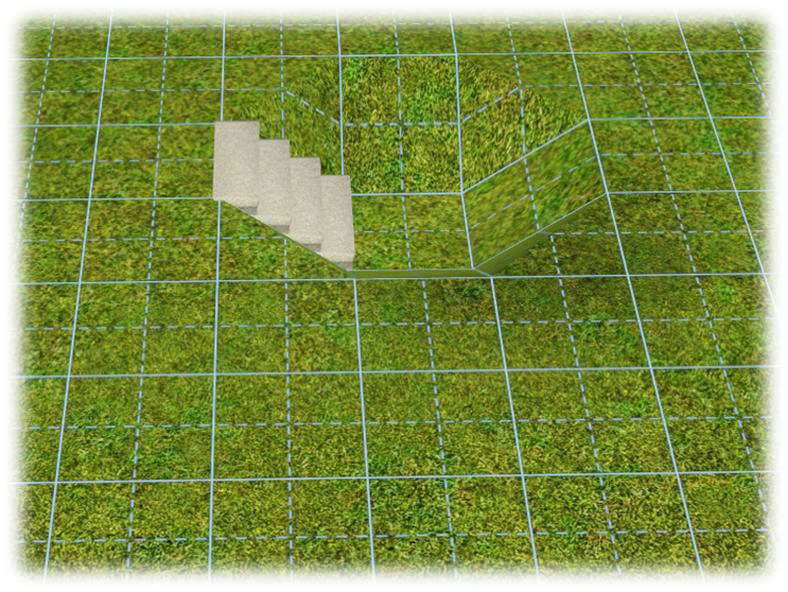
From the lowest point do the same to either the left or right side:

And, you might have guessed, from the new lowest point, add yet another. Then move this one toward the first one again (as if you are making winding stairs downwards).
When done, it should look like this:

That wasn’t too hard was it? 😀
Okay now get the sledgehammer tool and delete the 3 stairs you have just placed.
This will leave you just the different heights in the ground.

Next up, go to the wall section and create 1×1 rooms on each created level. When done, it should look like this:

OPEN UP THE CHEATWINDOW AGAIN (CTRL + C) AND TYPE: CONSTRAINFLOORELEVATION TRUE (ENTER)
Go up one level and place floors on each of the rooms.

Now, place stairs from the highest to the middle, and from the middle to the lowest like so:

You can now also create a 1×1 room on the main ground level and connect from the highest level to the “normal” First Floor. After you have done so, you can get that sledgehammer again and delete all walls.
What will be left is the winding stairs and the holes in the ground.
You do need to delete the stairs from the lowest level to the ground and go to the build mode and level the ground.

After you have done this, place the stair from the lowest to the ground again.
As you can now see, you have winding stairs 😀
Add the Ceiling Trims
This is were the ceiling trims come in. Before the Ambitions patch, there was no option to recolor the floor edge. Now you can choose either to recolor the edge or place the ceiling trims.
I have created them in 4 heights, 4 steps (lowest level), 8 steps (middle level), 12 steps (highest level) and 16 steps (full wall height).
You can place them after you have opened the cheatwindow again, type “MoveObjects on,” and vóila, placeable ceiling trims.

Of course you can build a room/house around these stairs, just take note that walls need to be placed OFF the stairs. Leave a minimum of 1 tile between the next wall and stairs.
Good luck creating your winding stairs in The Sims 3! And happy building!