
For this tutorial, I will be walking you through how to recolor a basic object for The Sims 4. We’ll be taking a painting and swapping it out for a different picture and updating the frame to look slightly different.
The tools that we will need for this are going to be TSR Workshop, which can be found here: http://www.thesimsresource.com/workshop/
You will need a graphics editor – I’ll be using Adobe Photoshop. Pretty much any version will work if you have access to it, but free graphics editors like The GIMP and Paint.NET are also usable.
You will need to have The Sims 4 installed, and you will need to have played it at least once to get it to generate its complete folder structure.
Getting your basic object recolor started
First off, upon opening Workshop, it may or may not automatically find the game installation where it will be looking for things to clone. Under Edit > Preferences > Folders, there are two key locations: “Base Game,” which you will point to the folder where TS4 is actually installed (in Program Files, typically something along the lines of Program Files x86\Origin Games\The Sims 4) and “Game Data” which points to your TS4 folder in Documents. (Typically something along the lines of Documents\Electronic Arts\The Sims 4.) Here is the Workshop home screen where you will always be starting:

From here, you can create a new project, open a .wrk file from somewhere on your computer, or reopen a recent file.
There is also a link to the forums. “Sims 4 Forums” in the center column will take you to the Sims 4 Workshop forums, where you can then select which subforum you want.
The “News and Updates” column is extremely outdated, and you can just ignore it.
There is also a link at the bottom that takes you to the Workshop download page, for when you need to update to the newest version.
Choosing a starting point for the recolor project
If you click on Create New Project, you’ll get a screen with several options:

These categories are fairly self-explanatory. Let’s click on “Object” and then click “Next.” (Or you can just double-click on object, and it will automatically proceed to the next screen.)
Depending on your computer, how many expansions, game, and stuff packs you have installed, it may take Workshop a minute before it finds everything. Once it’s ready to go, you’ll get a screen that looks like this:

For the scope of this tutorial, we want to recolor a painting. That will be found under Décor, so click the “+” to the left of Décor. That then drops down another list of all of the Décor categories. Scroll down a bit until you see “WallDecoration,” and click on that. It may take a few seconds, again, depending on your computer, but you’ll then see all of the paintings/posters/etc. appear in the big box on the right side of the window.
Here is where you scroll through all of the objects from that category to find the one that you want to use as a base for your item.
For the purpose of this tutorial, we’re going to choose “Blooming Beauty” Wall Painting – 3 Variations. Click on it, and you’ll get a little pop-up with all of the recolors displayed. Pick the one you want to work from. I’m just going to choose the first default one.

(For example, let’s say that a painting has 2 recolors — one that’s black and one that is white. If you want to use the black frame, you’d choose the black one, or if you wanted white, choose the white. If you wanted to change the color of the frame as well as the picture itself, then it doesn’t matter what you pick, since you’d be making a new one anyways.)
Then you’ll get a screen that will let you enter a Project Name, a Title, and a description. There is also a box for “This is a recolor only.”
- Project Name is how Workshop will keep track of the project.
- Title is the title of the object in game.
- Description is the in-game description.
- “This is a recolor only” will tell Workshop that you want to change the textures. If you want to make a recolor under the original object, check this box. If you want a standalone object, leave it unchecked.
Since we are making a recolor, check the box for “This is a recolor only.”
When naming your creations, make sure that your project name and title are unique enough that they won’t conflict with other objects. If you make something called “Red Painting” and then a week later make something else called “Red Painting,” the game is going to see them as the same object and one will override the other.
I also think that it is a good idea to include your user name and where you will uploading the content in the description, so that people can find you.
Once finished updating everything, click “Next.” Workshop will then display a rather useless screen basically telling you that it’s finished cloning the item, and you just click okay.
First things first, let’s save our cloned file by going to File > Save As. Save it with a name you can recognize and in a location you can easily find it. Note that Workshop saves things in .wrk format, which is its own native format. This is NOT the format the game uses. We’ll export a game-ready file once we are finished with the creation.
The Workshop Interface
Next, you’ll see the main Workshop window. This includes a 3D view on the left, and the work panels on the right where you do your actual editing.
- The “Project” tab is project related info, including price, title, description, categorization flags, recolor swatch thumbnails, etc.
- “Materials” is where you edit the actual texture images. There is a drop down box that lists each mesh group, and each material associated with that group.
- The “Mesh” tab has a drop down menu that shows each level of detail, and will show you each group in the mesh.
- Slots is the tab where you can adjust the slots of an object – spots on a table/surface where other smaller items snap into when you put something on something else. The slots tab also includes some more advanced things like footprints and bones.
- The “Misc” tab contains some more advanced things like cutouts (for windows and doors to cut a hole in the wall), various flags, and light sources (if the item is a light).
For our recolor, we will only need to the Project and Materials tab. In the Project tab, you’ll see this:

A preview of your item is displayed on the left, along with the wall shadow behind it and a ground shadow. (The green represents the ground, you can go into Edit > Preferences > Mesh Editor and change “Ground Color” to anything else you want. I personally set mine to white since I don’t want to see the ground.)
Moving on to the actual editing panels on the right in the Project tab, you will probably always need to change the “colorswatch” colors – the colors the game displays for your item when picking the recolor. You can change them at any point. I usually wait until after the object is finished, just don’t forget!
Along with the color swatches, under the “Tags” option, if you click on it, you’ll get a “…” button that will bring up a long list of check boxes. The second from the top is “Color.” I always update this to reflect the colors of the actual item as well.
Also, you may or may not want to change the price of your creation. I think 3370 is a bit much, so I’m going to bump it down to 350 for my poorer sims.
Let’s Recolor!
Okay! Let’s actually get started recoloring! Let’s head over to the Materials tab.
Upon opening the Materials tab, it will be blank. There is a drop down menu at the top – click on it. You’ll see something similar to this:

A bit of logic of what is going here:
- “Group 0” and “group 1” are the groups in the mesh. An object could have one, or two, or ten. Each group in the mesh get its own set of materials and textures that will be listed here. First off, note that the 0x00000000 material is literally nothing. If you click on it, it’s empty. You can just always ignore that one.
- Usually, not always, the way this works is that “group 0” is the shadow group (either wall or floor, depending on the type of object it is) and any other groups will be the actual object.
You can verify which group is which in several ways. In this case, it’s easy. An object has two materials, one for “regular” and one for “dirty/burnt.” Only the actual object group itself will have the dirty/burnt material, because obviously you can’t get a shadow dirty, nor can you can you burn a shadow.
Another way to tell is to actually click on one of the materials and see what textures it contains. If I click on the first material that is listed, I can see it’s just a shadow.

If I instead click on the material for group 1, I see this:

This is where the material for the actual object is.
Upon clicking on one of the materials for your group, the side panel will populate with a few texture images. This will usually consist of a Specular, Cube Map, Diffuse Map, and Normal Map.
The “main” texture is the diffuse map, which contains what is actually applied to the mesh.
The Specular map controls reflections and gloss/shine on your object to help make the material look more believable. (Plastic may be shiny versus fabric that wouldn’t be shiny, etc.)
The Cube map is a fake environment image that the specular projects onto the object. Because shine/gloss in TS4 is not real-time like it was in TS3, you’ll never need to touch the cube map.
The normal map is used to adjust the way that light falls on an object. You can use it to create small details that aren’t really there without having to actually put them on the mesh.
If you click on an image in the list, you’ll get an “Edit” button. This will bring up a window with Browse, Import, Export, and a few other rarely used options.
Export will let you save the image to a file so that you can open and edit it in your graphics editor. Note that TS4 primarily uses DDS format images, for which you will need free plug-ins from nVidia if you are using Photoshop. (Note they say only works up to CS6, but they actually work with pretty much any CSX version, as well as CC and CC2015)
If you are using The GIMP, you can find DDS plug-ins here: http://registry.gimp.org/node/70
You can also save to PNG files, if your editor simply does not have any support for DDS. Let’s go ahead and save our file again.
I’m going to click on the DiffuseMap to start with. Then click on the “Edit” button as mentioned:

This will bring up this dialog:

Along the top left, you can hide or show only certain channels if you wish. To the right are the Browse, Export, and Import buttons. Along the bottom are two options, Make Empty (from TS3, you’ll never use it for TS4) and Make customizable.
“Make customizable” allows you to import a mask, multiplier, and overlay, and then set channel colors to the mask as per how creating in TS3 worked. If you are familiar with creating for TS3, this may be something to investigate, otherwise, I wouldn’t bother. I find it easier to do everything in your graphics editor instead.
Click “export” and save it in a format that you can use (DDS or PNG) and make sure to save it somewhere you can find it. (I have a central folder for all of my creations, with each set getting its own folder inside, sometimes then further divided with a folder for each object.)
Now head on over to your graphics editor, and open up that diffuse map.
Let the object recolor work begin!
Now, on to actually editing the diffuse map.
If you look over your diffuse map, it’s fairly obvious that there are at least two main parts – the frame and the picture itself. There is also a third part, the back of the painting down there on the bottom right.
If we do a comparison of the texture to the mesh in WS, I can see that the dark part of the texture (at the top of the frame) is actually the bottom of the mesh, with the light part on the bottom of the frame texture actually being the top of the mesh. It’s only half a frame, so that tells me that the texture is being mirrored: what we create on this one half will be flipped and displayed on the other half as well.
The faded part of the frame that is on the top right of the texture appears to actually be the back of the frame. And since there is only a quarter of the frame being displayed, I am going to assume that it is being mirrored around the mesh four times.
A lot of EA objects are created this way. They can use smaller textures and have more room on their textures if they can double-up and reuse parts.
Let’s find a new picture to put in the frame! Time for a copyright lesson on what you are and are not allowed to use.
- If you took/drew/painted it yourself, obviously you can do whatever you want with it. Remember that you absolutely CAN NOT just find an image online that you like and use it. If you found the image on a stock photo website, make sure you check the terms and requirements for use. Some places require you to buy a license to use the image. Others will let you use the image for free, but you have to provide a link back to where you got the image from. If it’s an image from an individual photographer or artist, you need to ask for permission to use it.
- If it is a commercial image, for example, from Disney or Pixar, or any other large company, proceed with extreme caution. I’ve been on the Sims modding scene for 12+ years. I’ve seen where some companies may view it as free advertising, others, such as Disney and Starbucks, will instantly send you a nicely worded “delete this or we’re going to sue you” letter that I assume you do not want!
I’ll be using an image that I took myself, so I know I can do whatever I want with it.
Here I have now imported my image in on top of the original diffuse map as a new layer.

Since a real photograph doesn’t match the style of the game at all, I’m going to apply some filters to it to make it more like a painting.
If you want to do the same thing, be aware that the availability of filters will vary from program to program, as will the method of how to actually apply them. Here is my image, with a filter and cropped to fit over the square of the original image:

There are some little bits between the frame and actual image, but I don’t think it applies on the mesh, so I am not going to bother with covering them. I can always come back later and fix it if something is wrong.
Recoloring and retexturing the object
Now, moving on, I don’t like the gold frame at all. It doesn’t match the image! Not only the color, but I don’t really like all of the ornate details now that I’m looking at it. I think maybe a nice simple wood frame, or brushed metal even, would look much better.
When working with textures, I think it’s helpful to think of how the object would actually be constructed in real life. A picture frame isn’t just one piece of material; it’s usually four, put together. So I will approach my texture the same way.
To start with, I will change the color of the metal using the Hue/Saturation/Brightness feature. In Photoshop, this can be found under Image > Adjustments. I’ve decided on a smoky blue color.

Next, to start remaking the frame, I am going to use the polygonal selection tool to isolate one section of the frame, or what I think would be one section of the material. I’m going to fill it in with a new color.
Why did I bother to change the color if I am just going to remake it? Well, since I don’t know exactly how the texture fits on the item, there is a chance that there may be some little bits and slivers that my new texture doesn’t cover. Changing the color of the base texture will hide those exposed bits so that they match my new texture. That way, I can be sure I won’t have any random gold parts sticking through.
Adding a wood texture
To get the wood texture, a fairly quick generic method is to simply add some monochromatic noise to the image, and then add a motion blur. That gives me this:

I can now duplicate that piece and rotate it around so that it fills in the other parts of the frame, too.

Now I just need to erase the extra part, since the texture only goes halfway across the top and bottom of the frame. After flipping my texture around and cutting off all of the excess bits, I have this:

I am going to go ahead and save this as a DDS image, which in Photoshop, prompts with this dialog:

The top DXT dropdown offers choices of compression. DX1 is high compression with no alpha, DXT3 allows alpha with some compression, and DXT5 is the highest quality, also with an alpha channel.
If you use DDS, Photoshop will give you the option to save in DXT1, 3 or 5. DXT1 does not support transparency and is the lowest quality, and DXT3 supports transparency and is medium. DXT5 is the highest quality, and also has full support for transparency.
The alpha channel only matters if your object has transparency or not. In our case, we do not have any transparency, so we can go ahead and use DXT1 with no alpha.
Back in Workshop, click on the diffuse map in the Materials tab again. Click on the Edit button. Then in the top left, click on the “Import” button. Find the diffuse map we just saved, and open it. Workshop will then display it in the Texture Editor Window you have open. Click “done.” Workshop will then ask if you want to update all LODs with this texture. Click “Yes.”
Objects have different level of details. When you zoom in, it displays the highest level of detail. When you zoom out, and you can’t see the small details, it switches to a lower level of detail. You need to update the textures for each level of detail, otherwise your new recolor will fade back to the original when you zoom out.
Workshop will then update and show the mesh with your new texture! We’re not finished yet, though!

Adjusting brightness with the recolor
I think the frame looks kind of flat, so I’m going to go back to Photoshop and adjust the brightness to match the way that EA made the top of the frame brighter than the bottom. Let’s save the .wrk file again.
I will do this by applying a gradient overlay to the layer, which in Photoshop can be applied by double clicking on the layer, and in the window that pops up, choose “Gradient Overlay.” I’ve also adjusted the gradient so that it’s only adding darks and lights at the top and bottom:

It’s a very subtle effect, but keep in mind that the game will also apply lighting to the object, so we don’t want to make it too drastic.
I’m not going to change the back part of the frame, as it’s mirrored and rotated four times. There is no real way to do the same thing we did to the front. (Also, the back is going to either be against a wall, or hidden when the walls go down.)
I’ve saved the image, and I’m going to go back to Workshop and reimport it again, following the same steps as before. (Click on the diffuse map, click Edit, and then click “Import.”)
This time, though, Workshop is going to throw up a dialog box asking if I want to replace the existing image or not. We want to answer “Yes” to this. If you say no, it will import this as a new image, and the old one will be left in the file, wasting valuable space. Again, also click “Yes” when asked about updating all LODs.
Looking at the picture again, I am going to edit it one last time. I am going to make the inner matte of the frame (the light grayish blue) red instead, to match the leaf.
With the rectangle marquee tool, I’ve selected just the part of the frame I want, andI am using another Hue/Saturation/Brightness adjustment. This time I’m also using the “colorize” option to add in some more color instead of just changing the little of color that is already there.
“Colorize” is a great feature if you want to make a low-saturated color like white, black, or gray have more color.

Be aware that you may have to repeat this many times when making a recolor – adjust this, adjust that, tweak this other bit, reimport your texture a thousand times. That is why it is important to say “Yes” to replacing the image, because otherwise you could end up with 10+ textures in your file that you aren’t even using anymore!

Here is my final texture edit, which I am happy with. So, the diffuse map is finished! I am going to save the .wrk file again.
Specular Map and Normal Map work
Now, we know we won’t be doing anything to the CubeEnvMap, but that still leaves the SpecularMap and the Normal Map.
As per the previously mentioned tutorial, I am going to create a new specular map.
Note that there is no way to preview a specular map until you go into the game!
For the normal map, if you are ever in doubt if you need to make a new one or not, click the gray circle button at the top of the 3D view in workshop:

Once you click this, it toggles on the normal map display, and will render the normal map on your mesh instead of the diffuse map.
When I click on it, I can now see that my mesh is still going to have the shading of the original frame, even though we’ve changed the diffuse map texture. So, we need to change the normal map as well.

I have a tutorial on how to create a normal map here.
After updating my normal map:

Be aware that Workshop’s display is not 100% correct. Again, just like specular images, you need to go into the game to be sure that you have created the effect you want.
If you are only changing the color of something, updating the normal map may not be necessary. If you are changing the textures, you will almost always have to update the normal map to match.
Now, we have our textures all sorted and imported for the main material for the high level of detail. On the top left of the 3D view, there are four buttons, ranging from a circle to a square. These represent the levels of detail that are present in this creation. In this painting, you’ll notice there are only two. This essentially functions as a high level of detail and a low level of detail.
You will want to click on both to verify that your textures look correct on both levels of detail.
Now we just need to adjust the burnt/dirty material. From the material drop down at the top of the Materials tab, click on the second material for the main mesh (in this case, group 1).
When you open the second material, you’ll see all of the textures we just replaced revert back to the EA textures, and now there is another “DirtOverlay” added in as well!
Don’t worry, everything that you’ve done is still there! It’s just in the other material. We have to bring in our new textures to this material.
Click on a texture – I usually just go straight down the line – and then click on the Edit button. This time, instead of clicking on “Import,” we are going to click on “Browse.” We don’t need to import the textures a second time, as they are already in the file for the first material we updated.
Upon clicking browse, you’ll see a small window listing all of the images that you have imported. Clicking on one will display it in the box to the right.

For the specular map, find your specular image, and then click OK. Then click Done in the image editor window. Then Workshop will, once again, ask if you want to update all LODs. Click “Yes.”
Repeat this process for all of your textures – the specular, diffuse, and normal maps. The EnvCube map we’re still going to leave alone, and the DirtOverlay is EA’s generic texture that fits on pretty much anything. There’s no need to update it, either.
Once all of your textures are updated, make sure to check all levels of detail, and all materials to ensure that nothing was forgotten.
Once everything is finished, you can export your file to the game by clicking on File > Export > .package. Provided your game folders are properly set, you can also choose to export it to a package directly to your Mods folder. Save your file, make sure to give it a descriptive name so that people can tell what it is, and then you’re ready to check it out in game!

Editing the color swatches and thumbnails
The object itself looks good, but notice that it still has the original color swatches, and that thumbnail is terrible. Both of these are an easy fix, though.
Under the Project tab in Workshop, we can first go to the “Tags” option and click on it, and then click on the “…” to open it. Scroll to the top and find the color tags, and then uncheck the originals and check off the ones that are appropriate for your item. Click OK when you’re finished.

Then, go down to the bottom of the Project tab where the swatches are and change the colors to something more appropriate. (Note that you can right click to add or delete more swatches, but I generally try to stay at one or two. Three can work, but it gets crowded in that little thumbnail in game.
You can click on a swatch and click the down arrow to see some color pallets, or, you can click in the box that has the RGB value/name of the color, and just type in the color you want using the format “Red, Green, Blue.”


The “Variant Thumbnail,” that allows you to import an image to be displayed instead of the color swatch. I’ve personally found that the little box in game is simply too small for this to work, so leave that blank and stick with colors.
Underneath of that, there is a heading called “Thumbnail” – this is the actual catalog thumbnail that will be displayed for your item.
To create a custom one, take a nice picture of your item in the game (NOT from within Workshop!) and in your image editor, crop it down to a square image that is 128×128 and save it as a PNG. You can then expand the Thumbnail heading, click on “Catalog Thumbnail” and then the “…” to import it into the file. Note that Workshop will not display it correctly as a square, but it will still look fine in the game.
For recolors, Workshop also drops a little painter’s palette icon on top of whatever you import, indicating that the item is a recolor. Entirely new items do not have this icon appear on the thumbnail.

Save, and export back to a .package file. If you choose to export it directly to your Mods folder, Workshop will remember where you exported it last time, and will ask if you just want to overwrite the previous file or not. I always say “Yes” in the interest of saving a little bit of time.
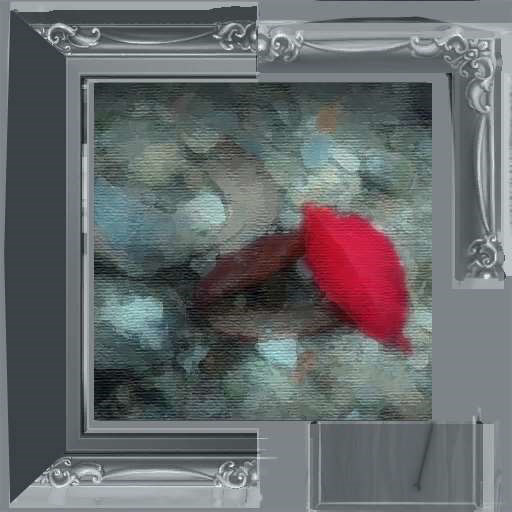
Now when we look at our basic object in game, everything is complete!

We previously saw that the painting looks as expected, and it’s not fading back to the original when we zoom out. It also now has a shiny new catalog thumbnail, and color swatches to match!