
To start, you’ll need to have a Tangent-Space normal map. It’s a bluish, greenish, pinkish image that will look something like the image pictured above.
(Normal maps are completely mesh/texture dependent, though – no two normal maps will look the same.)
The purpose of a normal map is to project details onto a mesh without actually having to have the details – it’s sort of like instructions on how to copy the lighting from one very detailed mesh onto a not-so-detailed mesh.
In my example image, the normal map represents wrinkles from a 40k poly chair cushion being projected onto a 1500 poly chair cushion, giving a level of detail that would otherwise be impossible.
Note that in The Sims 3, only certain things use normal maps. In The Sims 4, the normal map is a standard, required part of for all creations.
There are two ways to get a normal map:
- Mesh Based – You create a fully detailed, high poly version of your mesh. (UVs not needed, poly-count does not matter.) You then create a second reduced version that you would actually use in the game, with UV coordinates. You then use a program to “bake” the normals from the high poly mesh onto the low poly mesh. (This process is vastly different depending on what program you are using, and this article does not cover this process. You can search the internet for tutorials for whatever software you are using.)
- Texture Based – You feed your diffuse map into a generator that will analyze the lights/darks of the image and create a fake “normal” map based off of the details that are present in the texture.
Mesh-based normal maps are generally higher quality, as they are “true” representations of the details you are trying to capture with the normal map. Texture-based normal maps can be okay, but they will often result in your creation having a sort of “embossed” appearance that can be rather unpleasant and ruin an otherwise good creation.
TS4 uses a compressed version of a normal map, so we’ll need to convert the base tangent-space normal map image into the proper format before we can use it.
We will need an image editor that has the ability to work with channels. (Photoshop is the standard.) You will also need to be able to save your image in the DDS format. (Photoshop plug-in available here from nVidia. As of the time of this article, May 2019, the DDS plug-in still works in all versions of Photoshop, including CC 2019.)
How to compress a normal map for The Sims 4
Images on computers/screens are generated by three channels: red, green, and blue. Each channel is black and white, with black being, well, black, and white representing that channel color at full intensity. The three channels are then compiled into the final image that you see, the “RGB.”
From the Channels window (in Photoshop, open the Window menu, and choose “Channels”), you can click on each channel to see and edit it. The basic idea is that you copy/paste various channels into other channels.
The Red channel becomes the Alpha Channel.
The Green channel goes to all three base channels, taking over both the Red and Blue channels.
The Blue channel essentially goes away.
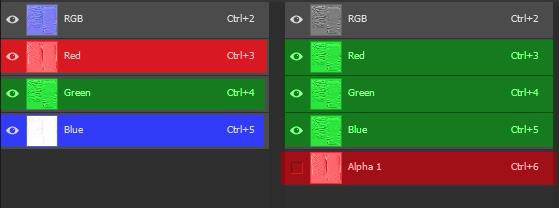
(Left) Original Channels, (Right) TS4 Channels
Before starting, ensure that your normal map image has no transparency. Some programs (Like Blender, for example) will bake a normal map on a transparent background.
If this is the case, you need to manually add a layer behind your normal map image, and fill it with R128, G128, B255. This EXACT shade of blue is the only “neutral” shade, any other color will affect the final result when the normal map is applied to the mesh in game. Flatten the image before continuing.
If you click on one of the channels, you’ll see your full color image switch to a black and white version. (You can click on the RGB channel at any time to see your full color image again.)
The first step is to click on the Red channel. The Red channel is going to instead become the Alpha Channel. To accomplish this, make sure the Red channel is active, then Select All. You can use the rectangle marquee tool, the Select Menu -> “All,” or you can simply press Ctrl+A on the keyboard to select the entire canvas.
With the entire contents of the Red channel selected, we are going to copy the contents by either goings to the Edit menu and choosing “Copy,” or you can simply press Ctrl+C. Click the “New” bottom in the bottom right of the Channel editor window:

You will now see a new channel appear, automatically labeled “Alpha.” Photoshop will also automatically switch over to this channel, of which the contents by default will be solid black.
We need to paste in the Red channel that we copied. This can be done via the Edit menu, and selecting “Paste,” or by pressing Ctrl+V. You should now see the same thing in the Red channel and the Alpha channel.

Next, click on the Green channel. Select the entire Green channel with Ctrl+A, and then copy it with Ctrl+C.
Now instead of creating a new channel, this time we’re going to click on the Red channel, and then paste with Ctrl+V.
Click on the Blue channel, and paste again. If done correctly, the Red, Green, and Blue channels should all three be a copy of the Green channel.
The Alpha channel (formerly the Red channel) provides the vertical details as lit from the sides, while the RGB channels (all three, formerly the Green channel) provides horizontal details as lit from the top and bottom. After all channels have been updated, your image will appear in greyscale:

Importing the Normal Map
The last step is to save this image in a format that will allow you to import it into your creation.
Save it as .DDS format:
![]()
Under Save Options, ensure that “Alpha Channels” is checked:

In the dialog that appears, change the format to DXT5 ARGB:

Then simply click save. No other options need to be changed.
Afterwards, when you import your image into your creation, it should be roughly half-transparent with various highlights and shadows:

The image MUST be semi-transparent. If you have no transparency, that means that the Alpha channel has gotten lost, and you need to re-save the image, double-checking the format and save options. Remember, the Alpha channel contains literally half of the data in the image!
Note that the specific shade of blue mentioned earlier, 128,128,255, after we’ve swapped the channels around will then equal 128,128,128 grey. ANY other color or shade of grey on the final normal map will affect the way your creation reacts to light in the game. If your item lights up weirdly, check the normal map!
Please note that this INCLUDES a completely blank normal map – a completely transparent image imported in place of the normal map WILL NOT WORK.