
Welcome to this guide to creating object textures in The Sims 3!
Who will benefit from this guide? Hopefully everyone! Beginners will be able to get started without any prior experience, people who don’t quite understand EA mapping and sizing of textures, and the more experienced will learn some advanced images such as dirty-states, transparencies, or the textures of non-recolorable objects, and this guide is especially useful for the myriad people who secretly don’t know how to use the Specular but would never dare to admit it!
This is Part 2 of the Object Creation series. If you haven’t learned about meshing yet, you need to start out with Part 1: Beginner’s Guide to Meshing first.
1. WHAT YOU WILL NEED
You will need a graphics package that will allow you to add alpha channels to your images, and that will support nVidia’s DDS plugin. Experience with using layers in your graphics program is an advantage.
Some programs that DO support the DDS format and offer varying degrees of support for alpha channels:
- Photoshop
- Photoshop Elements
- Paint Shop Pro (all versions)
- Corel Photo (PSP X and X2)
- GIMP (free)
For information on where to obtain the DDS plugins and how to install them, see our tutorial on DDS plugins.
1.1. A NOTE ON DDS DIFFERENCES BETWEEN PROGRAMS
Paint Shop Pro – the image is cropped but we only use the area I shaded pink – and only the two settings highlighted.
This tutorial will give pictures of the Photoshop version, but the settings are the same.

Photoshop’s DDS is a much smaller window but we use the exact same DXT1 and DXT5 settings (this time, they’re in a drop-down)…

…and this is the DXT5 setting we’ll use…

1.2 DDS – What is it?
It stands for DirectDraw Surface. It is a format of image that compiles your graphics, including environmental effects like shine and shade into a single database file. The Sims uses a series of images to make shading and shine, apply fixe graphics, and map out how patterns will be used on your objects.

Click on the TEXTURE tab in Workshop, and you will see all the main images we need to create. These are really individual layers of the final texture applied to the object. Once your object is in the game, these images are merged together with your chosen patterns to form a single texture (called a Complate) as shown below.

1.3. WHAT SIZE SHOULD MY IMAGES BE?
It’s not the size of your images that is important, but the size of your mapping ON the images. Each mapped part must be scaled to occupy the same space on your image that it does in the game.
So how do we do that? It’s easy. A Sim floor tile is actually 256 x 256 pixels in width and depth, and walls are 3 x 256 pixels high. Therefore, think about what proportion each part of your object would occupy on floor tiles, and make sure each occupies the same piece of space on your images.
Please note that there is no such DDS size as 768 pixels, so, for 3-tile objects such as columns, we use a 1024 pixel DDS image and map an area approximately three quarters (768 pixels) on that image.
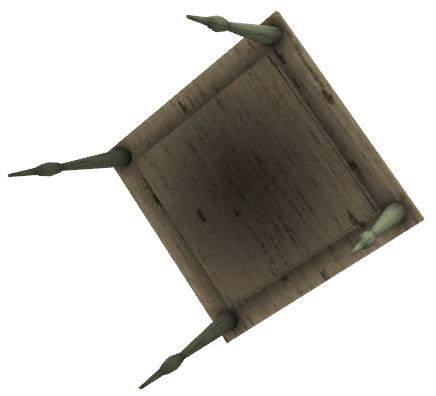
Look at this dining chair. The seat cushion, legs and lower fame (in separate parts) are all no bigger than quarter of a Sim floor tile, so these can be placed in areas no bigger than 128 x 128 pixels on the map.

However, the back of the chair is a full 256 pixels high. As it’s still only quarter of a tile wide, it will need 128 x 256 of space.
The chair also needs to map reverse and under sides separately too. You can now see how images start growing in size!
 Above is the chair’s UV map (made by EA). The size of the map is 256 x 512 pixels, and I’ve divided this into 128 x 128 quarter-tile squares so you can see for yourself how it has been mapped – mainly in quarter-tile spaces because the individual parts of the chair are all around that size in the game too.
Don’t worry about the professionalism of EA graphics! Unless you’re Artist of the Year (in which case you can come make MY Multipliers too), your textures won’t look like this, but they’ll be good enough!
1.3.1. EXAMPLE OBJECTS AND THEIR IMAGE SIZES
Tiny objects (128 pixels)
Objects that are half a tile or less (like the clutter magazines or the child’s toy xylophone use textures half a game-tile’s size – that is: 128 pixels wide by 128 pixels high.
Small objects (256 pixels)
Tiny objects that need a more detail like the wall clock (the front and rear mapped separately) or small objects like gnomes, some lamps and privacy windows usually have a 256 x 256 map size.

Medium objects (512 pixels)
Medium sized and more detailed objects usually have a texture size that is at least 512 pixels in height or width depending on how much detail needs to be mapped separately.
Large objects (1024 pixels – the maximum size)
Extra tall or wide objects, and medium objects with a lot of detail (TVs for example) require an even larger image. Doors, though only 512 pixels high, have different front and reverse colours so both sides have to be mapped separately as you’ll see later. Double doors and vehicles use the maximum size of 1024 x 1024 pixels!
 Giants!
Some meshes are clearly taller or wider than 4 game tiles high or wide (a 1024 pixel DDS image accommodates 4 x 256 floor tiles), so you will need to split the parts of larger meshes into pieces that can be mapped side by side. You can also overlap parts that share the same shading and pattern color. Your DDS textures should not be bigger than 1024 x 1024 in size so you need to break up your mesh so it WILL fit on this size.
Fat files
The larger your image sizes, and the more you add (for example: adding a number of stencils which we’ll come to later), the bigger your finished Sims3Pack will be. Ideally, you want to keep the finished Sims3Pack to 1Mb or less. Some objects, like plumbing items, have 2-3 ‘dirty texture’ DDS files too, and these will be heavyweight files if you don’t manage your image sizes economically. If you make objects 500Kb or less
(plumbing and dirty-state items at 800Kb or less), you have been very successful indeed!
2. STANDARD TEXTURES
These are the images you will always need for every object. Included is a step-by-step guide to making your first Multiplier. 90% of your effort goes into making a Multiplier because all remaining textures merely use a modified version of this image, so learn this part and you will have learnt enough to make texturing a breeze!
2.1. THE MULTIPLIER
The Multiplier is the main texture you’ll make for your object. It isn’t any more important than any of the other images, but after making THIS image, we can very easily make all the others based upon it. So we’ll put all our effort into this image. The others will be simple after this one is done.

This comes as a bit of a shock to people who created for earlier versions of The Sims, but all patterns and colors are now made in the game, not on the object. We now make the object, add shading and highlights, apply a couple of pre-selected patterns ourselves, and that’s it!
The Multiplier is used to mark shade and any texture details like grooves on your mesh’s UV map. These details are permanent, no matter what patterns are applied to the object in the game.
Multipliers are grey-scale images where 50% grey (RGB 128, 128, 128) is neutral. Anything darker adds shade, and anything lighter adds a paler area (useful for embossing and engraving detail).
 The key tip is not to be too heavy with dark shade! When making Multipliers by hand, this can be rather easy to do, but viewing your mesh in the Workshop’s 3D view will help you decide whether your shading is too much or too little. Multiplier shading can be subtle, yet the shading will still be visible. Overshading can result in your object looking like it’s been burnt.
FACTBOX: Multipliers
- Does it require an alpha? RARELY. Alphas are used only for non-glass transparent mesh parts
- Does size matter? YES. Multipliers must be the intended size of your UV map
- Can it be empty? NO. Missing multipliers make your mesh appear invisible in Workshop
- Saved as: DXT1/DXT5. Only save as DXT5 Interpolated Alpha if you use an alpha channel.
2.1.1. TO BAKE OR NOT TO BAKE?
Some 3D programs will bake a multiplier for you. Baking is an automated process of applying soft shadow to a mesh’s UV map, generating a grey-scale image that can easily be turned into a Multiplier.
Are the results better? Usually, they are. In the comparison table below, the overall shading of the baked table (on the right) looks better, showing that I might have been a little heavy handed with my multiplier for the table underside. However, the baked legs are less defined than I would like and so I would need to touch those up. There is a step by step tutorial on Baking Shadows, which uses the free Blender 3D program if you ever want to try out baking, but making a Multiplier by hand is quick and easy, and that’s what we’ll do next!
| HANDMADE Multipliers
|
BAKED Multipliers
|
 Advantages: easily made in advance, so makes UV mapping much simpler (a ready-made texture on which to map). Easy to overlap parts. Shading can be more defined in places where a bake might be too subtle. Advantages: easily made in advance, so makes UV mapping much simpler (a ready-made texture on which to map). Easy to overlap parts. Shading can be more defined in places where a bake might be too subtle.
Disadvantages: easy to be a bit heavy-handed on the shading. Some guesswork means having to check the mesh to ensure shadows are correctly placed. You need a good grasp on where shading will appear. |
 Advantages: very quick to produce and the end result is professionally applied realistic shadow. With a good UV map, baking will present no problems. Advantages: very quick to produce and the end result is professionally applied realistic shadow. With a good UV map, baking will present no problems.
Disadvantages: still needs post-production work to make them look right. Small parts won’t bake well. Sometimes, shading is too subtle. Difficult for less experienced meshers to overlap on the UV map. Baking might need a few attempts. |


2.1.2. MAKE YOUR OWN MULTIPLIER BY HAND
A hand-drawn Multiplier is easy to make. You don’t even need to be worried about being “artistically challenged” either because there are some simple, generic graphics program tools that will do much of the job very quickly and easily. In fact, once you’re used to making these, you can make the Multiplier before you make your mesh; your meshing and mapping will then be incredibly simple and quick, because you already have a useable texture on which to map your mesh and you can even overlap similar parts of the mesh.
This demonstration is a quick 10-minute demo to make a functional, basic Multiplier. You can improve your Multipliers later by following ideas similar techniques to those discussed in Enhancing your Multiplier on page
18.
Extract an image of your UV map
Unless you’re making your Multiplier before you make the mesh, you’ll need an image of your UV map. If your 3D program doesn’t export an image of your UV map (like Milkshape doesn’t) then you can use the free UV Mapper Classic to generate a bitmap image:
- Load up your High level of detail (High LOD) mesh into Milkshape
- Delete the ground shadow (usually group 0) – we don’t need this on our new texture map.
- EXPORT your mesh as a Wavefront OBJ file
- Open this file in UV Mapper Classic
- Then click Save Texture Map in UV Mapper’s File Menu 6.
You should end up with a rather crude black and white bitmap of your mesh. This will do nicely.

Switch to the correct image mode
Open your UV mapping image into a graphics program that supports the DDS format.
If using a bitmap (UV Mapper Classic only creates bitmap files), you will need to convert the image mode in order to be able to use layers and an alpha channel (if needed – discussed later):
For Photoshop:
Image Menu > Mode > RGB Colour > 8 bits per channel
For PSP:
Image Menu > Increase colour depth > RGB 8 bits per channel
Fill in the shapes
- Make a copy of the UV map image and place it on a new layer (we’ll keep the original untouched because we can use it as tracing paper later!)
- On your copy, select the white outer area and flood-fill it with a dark grey as shown below.

- Now invert your selection. This will select all our white mapped shapes
- UV Mapper makes these shapes a couple of pixels too small, so we need to increase the size of our selection before we flood-fill it and add 2 pixels.For Photoshop: Select > Modify > Expand
For PSP: Selections > Modify> Expand - Flood-fill your selected shapes with 50% grey (that is: an RGB shade of 128, 128, 128). Your end result should look something like the picture below: dark background with 50% shaded shapes of your UV map.

Note: EA often darkens their grey shades down to an RGB value of around 102, 102, 102. If you find your object too bright in the game, darken your Multiplier too. However, if you want to match EA walls (for example, when making a wall designed to join a building wall) you need to keep the grey shade around 50%.
Make the original UV map graphic visible for tracing
Remember the copy of the UV map we made in the last step? We want to turn that into a see-through layer. We won’t be drawing on this layer, but on the grey image we’ve just made.

Move your pristine UV map image to the top-most layer in your graphics program, and then set the transparency of the layer to something low (mine is set to 25%). You should be able to see your new grey image through the UV map image.
We can now trace around areas of our UV map easily.
Add detail and shading
I used some simple tricks, like putting embossed borders around grey boxes for a groove, using a Wingding font for the pattern in the middle, simple grey gradient fills to create bands of shading on the legs and some touch-ups with the Burn tool (if you don’t have a burn tool, a soft black brush will work too).
You can of course do whatever you like, but I will talk you through my Multiplier so you can see how easy it is to do. You will find it helpful to apply your Multiplier as a material to your mesh in your 3D program as you work so you can check it, or better still, into Workshop itself.
The table top
For the table top, I drew another 50% grey box (smaller) in a new layer and gave it an embossed border. That created the groove effect.

The decal in the center was from a Wingding-style font in another new layer – again, embossed a little because I want this to look like a shallow engraving in the wood. To make a deeper engraving, I would shade the inside of the design, but that’s not what I want.
Because the table top and sides will be fully exposed to the light once in the game, I haven’t added any additional shading.

Table underside
For the table underside, I darkened the main square slightly because the underside won’t be as light as the top surface.

I then made a smaller square in the same dark shade to sit in the middle for the lower underside section of the table. I added drop shadow to this new inner box to give the appearance of shade all around it (the drop shadow has no offset in any direction, so shadow is added to all four sides), and to finish, I used the burn tool on a large, soft brush to make the large shadow in the middle of it.
The edge of the underside (that right-hand dark strip) I burned where the edge joins the table top. I burnt the ends too because this is where the legs will create a bit of shade.
Finally (for the underside), I used a soft-edged brush (using black color) to make four leg holes. If you’re a bit hit-and-miss about painting, you’ll want to put these on their own layer too!
Note: the grey circle next to the table underside is actually part of the table legs, the final part of our Multiplier…
Finally, the table legs…
All the legs are mapped onto one area so there is only one that I need to make. Firstly, I wanted some bands of shadow (at either end of that lathed part and at each end of the leg).

To do this, I created a 50% grey box with a simple grey gradient. I made the gradient go to a darker shade at each end of the box.
![]()
I then copied this box to make three, and joined all three end to end.
![]()
Finally, I stretched the three boxes to fit the three segments of my leg (the main top part, the lathed bit, and the small part beneath the lathed section). These three areas can clearly be seen on my UV template.

After that, I placed two grooves at random points for the upper parts of the leg. How did I do that? Well, I cheated by copying and pasting a piece of the groove used on my table top. I made it thinner and not so embossed.
The legs need some inside shading. I simply passed the burn tool lightly along the length of the leg somewhere in the middle. I used guesswork for the position, and then popped back to the mesh in Milkshape just to ensure each leg was rotated so the shade pointed inwards. The burn is heavier at the right end of the image (top of the leg) where the leg is close to the wooden base of the table.

Finally, for the underside foot of the leg, I just darkened that small grey circle situated here just above the area of map for the leg.

Saving your finished Multiplier
- Before doing anything else, DO save your Multiplier in your graphics program’s main format (e.g. PSP for Paint Shop Pro or PSD for Photoshop). Some of these layers, like the motif, we can use in the other images. We don’t need to do all that work again.
- Now flatten your image to just one layer. For Photoshop, right click any layer and choose flatten image and for PSP, choose Merge (Flatten all)
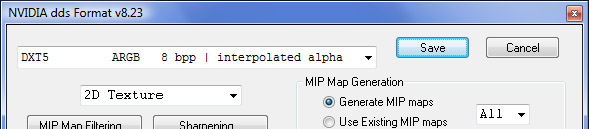
- To save your new Multiplier, choose SAVE AS and select DDS (sometimes shown as D3D/DDS). The following DDS options window should appear:

The top-most drop down list provides a range of DDS file formats. For Sims objects, we only use two of these:- DXT1 RGB 4bpp | No Alpha
- DXT5 ARGB 8bpp | Interpolated Alpha*
- Choose DXT1 RGB 4bpp | No Alpha (the most likely choice for Multipliers) and click the SAVE button. That’s it! Your Multiplier is made and the hard work done now (all of our remaining textures will use our Multiplier).
* Multipliers only have an alpha channel added to them if there is any transparency in the solid mesh.
2.1.3. ENHANCING YOUR MULTIPLIER
Whether you make your Multipliers by hand or bake them, you can add much more detail very easily.
Here is a stool made by Apple. It was baked in Cinema 4D which produces a nice, shaded Multiplier for his stool (Apple is an expert so if you’re new to all this, don’t worry about being this brilliant yet).

But Apple has refined his Multiplier with simple touches that perfect the mesh, and they’re fairly simple to do!
- First, Apple lightened the outer edges of the wood parts (this gives a more natural and less ‘sharp’ edge to straight parts).
- He then added some stitching to each corner of the cushion by a simple but effective dashed white line and a touch of shadow underneath it.
- Finally, he added creases with some random black and white lines that he blurred together to make realistic looking creases in the cushion. A bit of shade underneath completes a folded fabric effect. It is only physically possible to see two sides of the stool at any one time, so work is put into two sides of the cushion, and then this can be copied and pasted to the remaining two sides.
The finished result looks incredible! Without these improvements, the cushion of the baked Multiplier would have looked more solid and less natural. These are skills you can work on once you have more experience.

2.1.4. USING PHOTOGRAPHS FOR DETAIL
If you feel that drawing by hand is a challenge too far, it’s a little known fact that it’s also possible to use extracts of photograph to add small detail, and the end result can be remarkable!

I wanted vertical indentations for my water pump. They needed to be long in length, evenly spaced and slightly shaded. The first object I thought of was a simple radiator! A trashcan would have served equally well.
I found a free-to-use image of a radiator. I extracted a section of those indentations and straightened the perspective.

And to finish, I turned the extract into a Multiplier-friendly greyscale, and it works like a charm!

2.1.5. MULTIPLIERS TO REDUCE POLY COUNTS
This matching door and window frame are both using a Multiplier to add 3D shape.

Compare the door above with the mesh below: there is no real 3D detail in the mesh’s frame. Most of the ‘”shape” is merely shading on the accompanying Multiplier.


This helps keep poly counts down without compromising on the detail of your mesh.
2.2. THE SPECULAR
The Specular adds natural highlights and reflective parts to your object. The Specular is the most frequently misunderstood texture of all Sims images, yet it is very easy to make. We’ll look at how to make and use the Specular correctly.

Do NOT be fooled by the EA Specular!
It might LOOK empty in Workshop, but it isn’t. Speculars usually carry an all black Alpha Channel (more on alphas later), which gives the thumbnail image in Workshop the appearance of being empty, but it’s not.
Failing to update a Specular will add streaks of dullness and shine to the wrong parts of your object once it’s in the game, which will be extremely obvious if the player selects a shiny pattern for your object
2.2.1. HIGHLIGHTS
A Specular adds highlights, points that would naturally be a paler spot on your object when in window or lamp lighting. Look at any object around you and you will see a varying level of highlight resulting from the lighting around it, whether indoors or outdoors. Even the dullest materials often have paler spots of highlight. The main image of the Specular draws out these highlights and then lets the patterns in the game govern how much reflection (shine) they carry (fabric will have less reflection than veneered wood).
2.2.2. REFLECTION
Speculars also use an alpha channel which we’ll be looking at soon. Any white areas marked on the alpha will increase the level of highlight, making that part of the mesh reflect the environment around it regardless of the pattern applied to the mesh. Use reflection carefully as this can remove some freedom of choice from players. More information on how the alpha channel works is on the next page.
FACTBOX: Speculars
| Does it require an alpha? | YES | Alphas are black except where forced reflectiveness is applied. |
| Does size matter? | NO. | Must be the same size as the Multiplier unless empty. |
| Can it be empty? | YES. | But cases for needing a totally empty Specular are rare. |
| Saved as: | DXT5 | Speculars always have an alpha channel, so must be saved as DXT5. |
2.2.3. ADDING AN ALPHA CHANNEL
IMPORTANT! You MUST add an alpha channel to your Specular! If you don’t, Workshop will treat the missing alpha as all white, making your entire mesh highly reflective!
Speculars have an alpha channel, but what IS an alpha?
Think of an alpha as a black cardboard mask that you lay on top of your image to hide it. Then you cut out holes in the mask to let some parts of the image or special effect to show through. An alpha is like that, except for our “cutting out,” we draw white areas instead.
Alphas are frequently used for transparency (the black area masks the image and only the white cut-out allows that part of the image to be visible).
For the Specular, the alpha controls a special effect: strength of reflection.
In Photoshop, it’s very easy to add and edit alpha channels. Simply switch to the CHANNELS window (bottom right of your screen), and then click the button shown at the bottom of this picture to add a new alpha channel.

For Paint Shop Pro and other programs, here are some links that might help you with alphas as we work through the Specular how-to:
- Photoshop Elements
- Paint Shop Pro
- GIMP
TIP: excessive shine in the game means your alpha is probably white! Make sure you’re applying a black alpha unless you want maximum reflection to the brightest areas of your Specular!
2.2.4. MYTH-BUSTERS!
Many artists started with little or no information on creating a Specular, and some are still unintentionally following what they learned long ago without realizing they may have misunderstood what was really happening when using a Specular.
Indeed, some odd theories have been bandied about and the majority of early creators at one point or another have made incorrect Speculars as a result. If you are an experienced creator using this and realizing you might have subscribed (or still do) to one of the myths below, then you are amongst many!
Let’s rule out some of the false ideas about Speculars before we begin.
X The Specular is usually empty, so there’s no need to create one
Wrong – the Specular is rarely empty! The thumbnail of the Specular in Workshop LOOKS empty, but that’s because there is usually an all-black alpha behind it (and black alphas turn an image above them invisible). You MUST create a Specular for object to look right in the game.
X Speculars don’t need an alpha unless we need to use the alpha
Wrong – saving a Specular without an alpha will mean that an all-white alpha will be added by default, and you will soon realize that this is the very worst thing that could happen to your Specular, unless you’re intending making the shiniest object of all time, that is!
X Use a 50% grey alpha and the Specular will average out for all patterns
Wrong – any non-black shade on the alpha channel will force a dull sheen onto your object, meaning that coarse fabrics and materials like fur or rust will have a sheen too, spoiling the overall effect the player might want to achieve with your object. It will also impede the full-white alpha of a shiny metal pattern, limiting the shine the player will be able to attain.
X Using EA’s “empty Specular” image is fine
Often wrong. EA’s empty Specular is a white image with a black alpha. It doesn’t impede the effect of a pattern like the other myths, but it also doesn’t really take into account the natural points of highlight on your mesh either. The underside of a table would be highlighted as much as the top surface, which wouldn’t be correct.
X You must add a small dot of white to the alpha, otherwise it is lost
Not entirely true. The Workshop shows and works correctly with an all-black alpha. However, if you need to open your Specular in your graphics program to amend it, the DDS plugins DO drop all-black alphas, so you must remember to re-add them, or add a white dot to somewhere it doesn’t matter on the ALPHA of the Specular (e.g. in an unused corner).
? A Specular is simply a high-contrast Multiplier
Yes, a grey myth because it is not entirely myth. Upping the contrast of your Multiplier will often be enough, but you can still do a little more to bring out natural highlights as we’ll soon see.
2.2.5. HOW SPECULARS WORK
The alpha channel is infrequently used in Speculars (it is usually all-black) for the simple reason that any white areas on the alpha will force those parts of the mesh to be shiny, and forcing anything in Sims 3 limits the choice for the player. If you’ve ever tried to make an EA vehicle appear rusty or simply age it a bit by reducing the pattern to a less shiny version, you will know how frustrating that can be.
A Specular example!
As an example of the alpha effect, these hand dryers have been created in shiny and not-so-nice patterns.

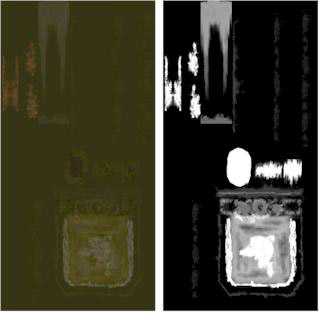
The Specular (and its underlying Alpha Channel) are shown below. The main part of the Specular is the greyscale image (in this case an increased-contrast version of the Multiplier), and the alpha is the black and white image shown beneath.
The entirety of the dryer appears on the Specular’s main image; it’s merely the Multiplier with greatly increased contrast until the most prominent parts are more or less white. The air outlet nozzle occupies the left of the map, whilst the main body of the dryer occupies the right.

However, only the nozzle appears on the underlying alpha channel. The main body of the dryer is not shown on the alpha. It is in fact quite rare to see the alpha being anything but black at all.
So what does this mean?
It means the body of the dryer has no reflectivity forced upon it. Shine will be governed by patterns that the player chooses, giving the player full control over shine (or lack of) just as shown in the two dryer variations above: a rusty paint with no shine, and a highly polished chrome with full shine – both merely pattern variations of the same object!
However, because of white on the alpha, the nozzle will now be reflective, regardless of pattern chosen. How reflective will still depend upon the lightness of the nozzle on the Specular image: the more white the nozzle, the more reflective it will be. If I want to lower the reflectiveness of the shine, I would darken the nozzle on the Specular but leave the alpha white. This overrides the Specular in the pattern chosen by the player, forcing a shine regardless.
2.2.6. HIGHLIGHTS IN COLOR
You can use color on the Specular to tint the highlights of your object. Color is added to the image itself (not the alpha).


This globe is using a blue tint to ensure highlights reflected on the ocean areas will always be tinted blue regardless of the color of light reflected on it. The land masses have no highlight at all (black Specular) creating the illusion of a different, non-reflective texture for the land.
2.2.7. MAKING A SPECULAR
A Specular is VERY simple to make. We’ll use a copy of our Multiplier. Increase its contrast until the whitest areas are as bright as they can go without looking over-bright and losing detail. Photoshop users can use auto-contrast to do this with a single click.
Sometimes, this adjustment alone is good enough. However, I made TWO further changes:
- I darkened the motif in the middle of the table. I don’t want this to pick up the same level of highlighting as the table-top when light reflects across the table surface; otherwise it will look like a transfer rather than a carving.

- The second change I made was to increase the highlight on the leg – the lathed part between my two lines of shading. For this, I used the dodge tool and brushed the area back and forth until the highlight had increased noticeably above the brightness of the remainder of the leg (a soft white brush will do if you have no dodge tool).
IMPORTANT! Workshop will not show the full effects (especially reflection) of a Specular very well. You’ll need to look at your object in the game before you see how the Specular will really take effect. Additionally, the Specular doesn’t always update in the Workshop 3D viewer. If you see traces of a former Specular on your model, simply import your mesh again or close and re-open your project.
2.2.8. DO I NEED TO ADD AN ALPHA CHANNEL?
Yes, you absolutely do! If you don’t add an alpha channel to your Specular, a WHITE alpha will be added automatically, and you’ve already seen what white alphas do to a Specular! Unless you want to try for the Most Shiny Object Ever award, add an all-black alpha channel before you save your image.
Unless you are using Photoshop, you might not be able to see the alpha channel. Many graphics programs are made only to add white to an alpha channel, which is not what you want. Not to worry; there is a very simple workaround if you cannot see your alpha channel.
2.2.9. AMENDING YOUR SPECULAR – A MISSING ALPHA?
The DDS plugins often drop an all-black alpha. For general purpose use, a black alpha does nothing and is considered a bit redundant. Of course, in Speculars, it is anything but redundant! One workaround to “trick” the DDS plugins into keeping the black alpha when you open a Specular in your graphics program is to add a small white dot to an unused area of the alpha. It isn’t needed for Workshop, but it WILL save you having to keep recreating your black alpha each time you need to edit it.
2.2.10. SAVING YOUR SPECULAR
As with the Multiplier, you need to flatten (merge) any separate layers in your image, and save as a DDS format image. This time we need to pick DXT5 ARGB 8bpp | Interpolated Alpha as our DDS choice (because we have an alpha in the file).

2.3. THE RGB MASK
The RGB Mask (known correctly as an RGBA Mask when used with an alpha) simply marks which parts of your UV map are colored by which pattern buttons in the Create-A-Style (CAST) tool in the game. Most objects in the game can have up to three recolorable parts, but some objects like doors and windows often use all four CAST buttons.
By painting our UV map with the simple colors of red, green and blue, we can make up to three recolorable parts! And it really IS that simple! We don’t even need to use an alpha unless the object you’ve made uses all four colors.

2.3.1. WHAT DO THE COLORS MEAN?
The red, green and blue colors represent each of three pattern selectors in the game (the fourth is used by windows and doors only).

Red areas of your RGB Mask are colored in the game by the first pattern, green areas of the RGB Mask are colored by the second pattern, and blue areas are colored by the third pattern.
Some objects such as windows and doors often use FOUR pattern selectors. Although the RGB format has only three colors, we can use an alpha for the fourth. We’ll look at that later. For ordinary objects like this table, a maximum of three patterns can be used.
FACTBOX: RGB Mask
| Does it require an alpha? | MAYBE. | Only if your object is using all four pattern channels (RGB + alpha) |
| Does size matter? | NO. | If your mask is all red, you can safely use a 64 x 64 all red image.< |
| Can it be empty? | NO. | An all-red RGB Mask is the minimum you must provide. |
| Saved as: | DXT1/DXT5 | Only save as DXT5 Interpolated Alpha if you use an alpha channel. |
2.3.2. HOW TO USE THE COLORS
- 1-pattern objects: – make the RGB mask all red
- 2-pattern objects: – make the main part of the object red, and the second part green
- 3-pattern objects: – make the main part red, the second largest part green, and the last part blue

(4-pattern masks are covered later)
2.3.3. MAKING AN RGB MAP
Making an RGB Map is simplicity itself. I have faded mine so that the Multiplier shows underneath and you can see what I did. I’ve made a table that will use three patterns: the legs will be one color, the main table parts will be another, and the center of the table will be yet another. For fun, I used a star pattern to show the power of this simple image.
 |
 |
- Open your Multiplier
- Create a new layer
- Now draw color over your Multiplier. Don’t forget: if your object is to be one pattern only, just fill the entire image with red. You can also use an EA all-red image instead if you prefer.
2.3.4. WHY RED, GREEN, AND BLUE?
RGB Masks can only use pure red, green and blue, but why?

When painting in pure red, green and blue colors, we’re actually painting white on the RGB channels of the image (and anyone who has made Sim patterns will already know about these). The game is using the underlying channels. Each channel links to a pattern slot in the CAST tool. If you paint white directly into any of these channels, the main picture will show pure red, green or blue.
However, as many graphics programs don’t make channel work all that easy, using pure red, green and blue does exactly the same thing! It happens automatically. We don’t need to work in the channels themselves in the same way we would if making patterns for three-pattern objects.
2.3.5. MAKING 4-PATTERN RGBA MASKS
Here is an RGB Mask using all four patterns for a window (an RGBA Mask – the A stands for Alpha). The fourth color is the orange area. If you haven’t done so already, please read the last bit of information on why we use red, green and blue. This will explain about how we’ve been using RGB channels (not just making a primary-colored mess)!

RGB images are only made up of three channels and so will only link to three of the pattern slots in the game. Therefore, we have to add another channel, and the only way we can do that is to add an alpha channel and paint THAT white! Looking below, you see the alpha with white painted on it.

So, what is the orange?
It’s simply a non-red, green, blue color that is being used to show where the fourth color is located. It’s just for our information (the game uses the white on the alpha channel). The orange could be ANY color. Indeed, the EA baby high-chair has a bright pink color to indicate where the fourth channel is located. The color is immaterial; it is the Alpha channel that is read by the game.
For anyone who cannot paint directly onto their alpha channel:
- Paint the main image in dark orange where you want your fourth pattern to be used.
- Select your orange area.
- Save your selection to the alpha channel.
2.3.6. SAVING YOUR RGB MASK
If your RGB mask is three colors (red, green and blue) or less, then you simply save your image as the standard DXT1 (no alpha) format.
If your mask is an RGBA Mask (i.e. it uses four colors: red, green, blue and the alpha channel), save as DXT5 Interpolated Alpha.

2.4. THE OVERLAY
There are two very similar types of fixed images you can use in your completed package: Overlays and Stencils (discussed later). Both apply fixed, non-recolorable decals to your mesh. They’re entirely optional.

| Overlays | Stencils |
| An Overlay shows on all texture variants (recolors) of your object. | Different texture variations of your object can have different Stencils in combinations. A Stencil only applies to the color variation to which it has been added. |
| There is only one for the object in entirety. | You can have up to four Stencils layered per texture variant. |
| Overlays are imported as one of the four main DDS images. | Stencils are imported per color variation in a special area beneath the pattern slots. |
As with all other images, the Overlay is based on our UV map to chart where its image should appear. Overlays aren’t recolorable, and so their appearance on the RGB Mask is not important. There is no sign of the flower image in the middle of the red sun (where in reality it sits) because an Overlay is not recolorable and so overrides any coloring on the RGB Mask.

FACTBOX: Overlays
| Does it require an alpha? | YES. | Alphas are black except where forced reflectiveness is applied. |
| Does size matter? | NO. | Must be the same size as the Multiplier unless empty. |
| Can it be empty? | YES. | See the appendices for making use of an empty Overlay from EA. |
| Saved as: | DXT5 | Overlays always have an alpha channel, so must be saved as DXT5. |
2.4.1. HOW OVERLAYS WORK
Overlays work by using an alpha channel. The entire alpha must be black EXCEPT where the overlaid image is located (which is usually white).
Typically, the unused part of the main image is some shade of black, grey or white, though this empty space can be any shade because it’s ignored wherever the alpha behind it is black.


Therefore, the alpha is the controlling layer. This is usual for many DDS images for Sims 3. If I drew a white square at the bottom of the alpha, even though there is no image there on the Overlay itself, my mesh will be overlaid with a grey square. The alpha must be black unless you want the Overlay to override any part of your mesh’s texture. Any shade of grey will show the Overlay image with some transparency, and pure white or white will reveal the Overlay image in full, solid color.
2.4.2. MAKING AN OVERLAY
- Open your Multiplier in your graphics program – we’ll use this as a guide to where the Overlay image needs to be.

- Create a new layer above it
- Draw the image for your Overlay, positioning it exactly where you want it to appear.
- Select your new image, but not any of the background around it. I found it easier to select the blank space with the Magic Wand selector and then invert the selection.
- We now need to add our selection to the alpha channel.
 If you have Photoshop, you can simply switch channels, add a new alpha as shown, and fill your still-highlighted selection with white.
(EDIT menu, FILL, White)For any other program, go to your Selections menu, and save your selection to an alpha channel. For more help with using the Alpha Channel, see Alpha Troubles in the appendices.
2.4.3. SAVING YOUR OVERLAY
As with the Multiplier (on page 17), you need to flatten (merge) any separate layers in your image, and save as a DDS format image. This time we need to pick DXT5 ARGB 8bpp | Interpolated Alpha as our DDS choice (because we have an alpha in the file).

2.4.4. REPLACING AN EXISTING OVERLAY WITH A BLANK IMAGE
If you have cloned an object that already has an Overlay, but you don’t need one, you can replace it with a blank image already in the game. For more information, see: Appendix 2: Replacing images with empty versions.
3. SPECIAL TEXTURES
Special textures are optional and are only used in some instances. Familiarize yourself with making the primary textures before embarking on these.
3.1. STENCILS
Most information about Stencils has already been covered in Overlays.
Stencils are mainly used for flat, 2-dimensional decals, logos, and texture effects to affix to your mesh as part of a particular texture variation. Like Overlays, they are non-recolorable.

The BIG difference with Stencils is that Stencils only apply to a particular texture variation. You can have a different set of up to four layered Stencils for each texture variation of your object. However, DO bear in mind that every image you add to your object will ramp up the file size and files that are too big will be difficult for lot builders to use in their uploaded lots (if that’s what you intend for them).
AnoeskaB made these gorgeous Milk Churns by layering rust stencils. The first texture variation uses a single light rust stencil, whilst the second texture variation combines different rust effects on layered stencils. They are very powerful in allowing you to layer effects and make color options that aren’t just based on in-game patterns.

3.1.1. MAKING YOUR STENCILS
- As usual, use your Multiplier as a template.

- Paint the graphics for your Stencil on a new layer.
- Make the decals white on the alpha channel.

- Save as DXT5 Interpolated Alpha.

3.1.2. IMPORTING STENCILS INTO WORKSHOP
Stencils are not imported with the main images of our object, but are imported into the Stencils section of the Textures tab (there is a Stencils area for each texture variation). You’ll find this area at the bottom, just beneath the pattern slots.
Scroll down below the pattern slots and you will see + Stencils at the very bottom. Click the + to expand the view.

You will see four available stencils: A, B, C, and D. Use them in consecutive order (i.e.: if you only have one Stencil, always use Stencil A).
To import your new Stencil:
- Select on the image.
- Click the EDIT button.
- Click the Import button (marked with a green arrow), and repeat for any additional Stencils you wish to add.

- Ensure that Enabled is set to True.

3.2. DIRTY-STATE OVERLAYS
Many objects have Dirt Overlays that transform an object if a Sim has been less than clean! These are what you see when a Sim action triggers the “dirty state” of an object.

When you make worktops, stoves and any item of plumbing, these special overlays will also need to be made. If you fail to change these, when a Sim dirties your new toilet, you might find the seat dirt imprinted on the cistern! Therefore, it’s important to remember dirty states for such objects. It does mean that an object with dirty states will be a larger size file, but this is the same for EA’s own dirty-state objects available in the store.

3.2.1. FINDING THE DIRT OVERLAYS
Dirt Overlays are really just ordinary overlays, but they are stored in a different part of Workshop. To find them, you need to go to the Mesh tab of Workshop, and expand the materials attached to your mesh.
- Find the main mesh in the list of mesh groups. The pedestal sink’s main mesh is Group 1.
- Expand the Extra list at the bottom of the group to view all materials being used for the mesh (the number and design of these will vary with each object).
- Select each listed material.
- Notice that the mesh in the 3D viewer shows the material you have selected.

This will open the Materials Editor.
3.2.2. THE MATERIALS EDITOR
The Material Editor is a pop-up window showing details of the material we have selected. You can see the Dirt Overlay listed just beneath the Diffuse settings.

Click the Dirt Overlay image and then click the EDIT button to open the Image Editor.

3.2.3. EXPORTING AND IMPORTING DIRT OVERLAYS
The IMPORT and EXPORT buttons are at the top right of the Image
Editor.
You can click Export if you wish to examine EA’s Dirt Overlay. When you’ve completed your own overlay, simply click the Import button.

3.2.4. MAKING THE MOST OF AN ALPHA
A Dirt Overlay will show us what is really possible with alphas, and why alphas do all the work in overlays.
This Dirt Overlay by EA also matches the UV map of the sink, so use your Multiplier as a template when creating a Dirt Overlay as we did with the main Overlay. Beyond that, the Dirt Overlay is filled with smeared greens and browns. Some EA Dirt Overlays are just a mess of greens, reds and browns with no definition of shape on the main image whatsoever. That’s because the real design is done on the alpha.
You’ll find you really don’t need to be too particular about the main image for a great-looking dirt result!
3.2.5. MAKING A DIRT OVERLAY
- Making the main image: As usual, load up your Multiplier, then add a transparent layer on top of it.

- Paint blobs and smears of greens, browns, reds and oranges. If you want a particular color of dirt, or a particular texture, paint these where you want them. Otherwise, you don’t need to be too careful with what you paint where.
- To finish the main image, place a new layer underneath your painted layer and flood-fill it with a dark green or brown to ensure all gaps are filled.
- Merge your flood-filled layer with your painted image and make the new merged layer invisible for now.

- Making the alpha: Add a new transparent layer over the Multiplier.
- Now paint this in shades of grey and white as shown below where you wish dirt to appear:

- Areas with no dirt: leave blank – no need to paint anything.
- For some dirt smears: use shades of grey (the brighter the grey, the more dirt will show).
- For solid dirt with no pattern showing through: paint white on the alpha.
If you cannot make a greyscale alpha in your graphics program, then you can either use gentle amounts of white, or you can cheat and use EA’s dirt maps (see Cheating on dirt!).
- Now add a new layer under THIS painted layer. Flood-fill it with black.
- Merge your grey-scale painting and your black-flood filled layer. It should look something like EA’s alpha: a grey-scale decorated mesh where you want dirt to appear from your main image.

- Save this new image to your alpha channel.
- Now make visible the green/brown layer you hid at step 4.
- Flatten the image into one merged layer. Your green image now has an alpha channel and be ready for saving!
3.2.6. SAVING DIRT OVERLAYS
As with regular Overlays, save as DXT5 I Interpolated alpha.

3.2.7. IMPORTING DIRT OVERLAYS
Once you have made your new Dirt Overlays you will need to replace both the HIGH and LOW level of detail meshes. This is very easy to forget!
First, Import the high detail Dirt Overlays.
- Ensure that you are working on the High level of Detail mesh.

- Expand the EXTRAS listed under the mesh group for your main mesh.

- Click on a material and click the three dots button to display the Material Editor.

- Select the Dirt overlay shown below and click Edit to open the Image Editor (it will be a green/brown image with some transparency and there may be more than one with differing levels of dirt).

- Replace each of the Dirt Overlays with your replacement Overlays by clicking the Import button at the top right of the Image Editor window.

- Repeat for every Dirt Overlay that needs replacing. Ignore any dirt that seems to be a black/brown image – this is the “smoke damage” image and doesn’t really need to be edited.
Now, let’s update the materials of the low level of detail mesh.
- Switch to the Low Level of Detail mesh.

- As before, select each material to expand it in the
Materials Editor. - Select the Dirt Overlay in the Materials Editor and click the
EDIT button.

- You don’t need to import your Dirt Overlays again (you imported them for the High level Of Detail mesh, so we only need to point this mesh to those that we’ve imported already.
Click the Edit button to display the Image Editor, and this time click the BROWSE button!

- Select the Dirt Overlay you imported for your high-detail mesh and click OK.

3.2.8. CHEATING ON DIRT!
If you are worried about preposterous file sizes, or you have a lot of difficulty creating a greyscale alpha correctly in your graphics program, then one very easy way to avoid all the headaches with creating Dirt Overlays is to cheat!
Simply map the key parts of your mesh to the same spots on the original EA Multiplier.
Here is a Multiplier for a toilet made by EA.

The key parts (seat, bowl, pedestal and cistern) are all discernable. If you map your toilet seat and bowl (at the very least) to the same places that the EA toilet used, the original EA Dirt Overlay (shown below) will work for your mesh too. This will actually be good enough to look “right.”
For even greater accuracy, map your cistern and pedestal to the same spots too.
You can still make your own Multiplier, but keeping key parts in the same locations will ensure that you can use the original dirt without making your own and inflating your Sims3Pack file size.
This technique not only keeps your Sims3Pack file size down, it is also one way you can have great-looking dirt effects if your graphics program won’t allow you to make greyscale alphas.

3.3. TEXTURES OF NON-RECOLORABLE OBJECTS
Objects that are non-recolorable in the game do not have ordinary textures such as Multipliers, RGB Masks, and Speculars. Indeed, you will notice that the Textures tab of Workshop is empty.
Sims 2 creators among you will breathe a big sigh of relief to find that non-recolorable objects have a single fully-painted DDS image very similar to those created in Sims 2!

3.3.1. WHY USE A NON-RECOLOURABLE OBJECT?
This is a GOOD question! Ideally, you won’t unless absolutely necessary because this strips away any choice for the player. However, there are some instances where using a non-recolorable object is necessary:
- If a non-recolorable object allows behaviors that cannot be found in any colorable object.
- If an object you’ve made simply would not need recoloring (like the magazines pictured above).
I’m making an object that arguably fits BOTH criteria! I’m usually known for making not-so-nice things, and in this example I am indeed making something not-so-nice for a bathroom floor. I expect my mother would say that this is nothing to be proud of, but there we all are.

This toilet roll doesn’t really need recoloring (though had I the choice, I would have made it so). My primary need for cloning a non-recolorable object is that I want Sims to be able to walk over the object, I want it to fit on a quarter tile, sit in front of a toilet without impeding access to Sims, and I want it useable both indoors and outdoors, and on floors and counter-tops. The ONLY object in the base game that meets all these requirements is the decorative “clutter magazines” object – and that is non-recolorable!
3.3.2. FINDING THE TEXTURE
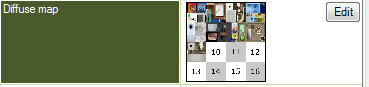
The texture of a non-recolorable object is found on the Mesh tab of Workshop, listed as “default material.”

In the case of EA’s Clutter Magazines, the main mesh is actually group 0. I’ve selecte4d the default material (highlighted in green). Clicking the dots opens the Materials Editor, where we’ll find the texture.
The image we actually require is labeled as the Diffuse map. Click the EDIT button to view it in the Image Editor.

And here you see EA’s secret! Most of the small non-recolorables share a single texture held in one of the internal game libraries (the magazines use the top left corner of it), but don’t worry, we can replace this with our own texture (and our texture won’t need to be shared!).

3.3.3. MAKING A TEXTURE FOR A NON-RECOLORABLE OBJECT
As usual, you will make a DDS image based on your object’s UV map. However, this image is full color! Because non-recolorable objects don’t have multipliers or speculars, the impression of shade and highlights will need to be added to this single image too.

3.3.4. SAVING NON-RECOLORABLE TEXTURES
Non-recolorable DDS textures don’t need an alpha, and so we save the image as DXT1 No alpha.

3.3.5. IMPORTING THE MATERIAL
The material appears in two places under the High Level Of Detail mesh, and twice again under the Low Detail mesh. All must be updated. However, we only need to import the texture ONCE, so let’s do that first.
Import the first texture…
- Select the Default Material immediately under the mesh group name.

- Click the three dots button as shown above to open it in the Materials Editor (below).

- Select the Diffuse map to open this image in the Image Editor.
- Click the IMPORT button to replace the EA image with your material.

Now that we have imported our new Material, we need to ensure all other materials that previously pointed to the EA material now point to ours instead.
The Extra Material
Still on the High Level of Detail mesh page, now expand the +Extra list in the mesh group (beneath the “Visible” setting).

The main material is nearly always the top-listed material (though do always check). Select the material and click the three dots button.
If you have selected the correct material, you will see EA’s full color texture (not a shadow image).
Click the EDIT button to access the image in Image Editor.
Click the BROWSE button and select the image you imported earlier.
And now repeat for both the Default Material and Extra material for your Low Level of Detail mesh materials too!

3.4. WALL MASKS FOR WINDOWS, DOORS AND ARCHES
Doors, windows and arches use an additional special image that creates a cut-out hole in the wall.

These are called wall masks. Because they don’t contain any real detail, they are usually very tiny in size – for example: 64 pixels wide by 128 pixels high!
Wall masks are purely black and white alphas, where white represents a single visible wall segment, and black represents a transparent hole in the wall. There is nothing complicated about making these other than ensuring your hole is not too big or too small.

Wall masks can now be generated in Workshop. However, it is useful to know how to make Wall Masks yourself in case the Workshop does not give you the result you needed.
3.4.1. WHERE ARE THE WALL MASKS LOCATED?
You’ll find the wall masks listed under the Workshop’s Misc tab. There will be an inside and outside mask for every tile of your window. You only need to change either the inside or the outside for each mask (they update each other automatically).
If your window is more than one tile wide, you will need to make masks for each wall segment that the window occupies.
Select the EDIT button to open them in the Image Editor from where you can import and export these masks.

3.4.2. MAKING A TEMPLATE OF YOUR WINDOW IN MILKSHAPE
We start out by using a 3D program that has grid sizes to match Sim tiles. Milkshape does that by default, so that makes life very easy! I’ll be using Milkshape for this demonstration.
- 1. Import your low detail window mesh into Milkshape as usual (import a TSR Workshop Object). Low detail windows don’t have wall shadows to get in the way!
- Change Milkshape’s grid setting to 0.5 under File > Preferences. Although a grid size of 1 is the correct size for Sim tiles, you will find your window is sat between two tiles. Halving the grid will therefore give us a grid we can still use without moving the window. Note: sometimes you will need to minimize Milkshape’s window and restore it to see the grid change.

- With a grid size of 0.5, a Sim wall is 2 squares wide, and 6 squares high as shown in the area I’ve highlighted on the right. We need to cut out this area as the base for our new wall mask. Take a screen print of the Milkshape window (press ALT-Prt-Scr on your keyboard) and paste it into your graphics program ready for editing.
- Crop your screen print image until it is exactly 2 squares wide and 6 squares high.
- Then resize the image to match the size of the wall mask that EA used (this wall mask is 64 x 128 pixels).Your resized template will be a bit of a blur, but that’s okay.

- Now paint the window area completely black. For best results, paint the black area to somewhere in the middle of the frame, but try not to stray over the edge otherwise you will have holes in the wall around your window!

- Now paint the remainder of the mask pure white (I selected my black area, then inverted my selection and flood-filled it white)

- Finally, put the exact same image in the alpha channel. If your graphics program does not offer a visible alpha channel to edit, try selecting the white area of your Wall Mask, going to your Selections menu, and saving the selection to an alpha channel. For more help on making alphas, see: Appendix 1: Alpha Troubles? A solution for everyone!

3.4.4. SAVING YOUR WALL MASK
The image is using an alpha channel so save as DXT5 I Interpolated alpha.

3.4.5. IMPORTING YOUR WALL MASKS
Wall masks are found under the Misc tab of Workshop.
I’ve opened a 2-tile window so you can see how these masks are made. As mentioned previously, although both inside and outside masks are displayed, you only have to change one of these (the other will be updated automatically).

To replace a Wall Mask image, simply click on the mask you wish to replace, and click the EDIT button. This will open the Image Editor.
Click the Import button to import your new Wall Mask.
Please note it is not possible to add or remove Wall Masks.
3.4.6. CHECKING YOUR WALL MASKS
The 3D viewer of Workshop will give you a good representation of how accurate your Wall Mask will appear in the game. On the Misc tab, you can opt to show a backdrop wall and also pick a color for the wall. This wall allows you to examine your Wall Masks in action.
The Wall Mask for the window below is showing some problem points. Two leaks of wall are showing on the inside of the window, so the black of my right-hand Wall Mask needs to be repaired before I finish this window.

3.4.7. THE AUTOMATED WALL MASK GENERATOR
The Workshop includes a facility for generating Wall Masks automatically. Look to the bottom of the Wall Masks on the Misc tab and you will see the word Generate. Click this to open the Generator settings page.
By default, the Wall Mask is generated by using the window glass as a template. If your window isn’t using any glass, then deselect this box so that your window frame will be used instead.
The Generator will make a good first guess at your window and you might not need to adjust any of the settings at all.

However, if you find you do need to change the mask, experiment with the threshold and feather sliders until the mask looks exactly as you want it in the 3D viewer. The z-clipping feature will allow you to include or exclude part of your mesh when basing the mask on the window frame rather than glass. For example, with partially closed shutters, you would want these eliminated from Workshop’s estimation of the mask.
3.5. TRANSPARENCY
It is possible to make parts of your meshes transparent or even totally invisible by adding an alpha channel to your Multiplier and changing its transparency setting.
3.5.1. INVISIBILITY
To make the chains of this drawbridge would have demanded a lot of polygons, so I made simple flat planes and painted a series of chain links onto the Multiplier instead. I needed to use an alpha with my Multiplier to make that part of the mesh see-through.

The transparent part of the multiplier is where I’ve highlighted in red. Although the Multiplier doesn’t show this area as anything special on the actual image, the area behind it on the alpha is black (black is invisible). This, together with an alpha transparency setting, will be invisible in the game.

The rest of the alpha, including the chain links themselves, is white (white is solid). This is the actual alpha of the drawbridge’s Multiplier.

This is how decorative plants are made too.

3.5.2. SHEER TRANSPARENCY
This beautiful sheer curtain made by Angela shows a perfect mesh transparency.

Important! Transparency is an advanced technique. There are still uncertainties about the settings that need to be changed and you will need to experiment with the methods described to achieve it.
In order to achieve a sheer effect, you will need to use a grey shade on your Multiplier’s alpha, starting with a 50% grey and experimenting with darker or lighter shades to achieve the sheerness of the material. This is the Multiplier and alpha channel used to create Angela’s curtain.

The darker the grey, the more transparent the material will become.
Some graphics programs will support greyscale alphas while others will not.
3.5.3. SETTING TRANSPARENCY OF THE ALPHA
IMPORTANT! Workshop will not show level of transparency accurately. You’ll need to look at your object in the game before you see how transparent your mesh will look.
When using transparency or invisibility, you will need to change some settings on the mesh material. Go to the Mesh tab and find the mesh group you need to change. Click the Default material entry as shown below.

Click the button with the three dots to expand this selection. This will open the Material Editor. The shader drop-down needs to be changed from Phong to Phong Alpha.

The Alpha Mask Threshold can be a value of 0 (solid) to 255 (invisible). When EA uses transparency settings, they use values 0 for solid, then 60, 120, 150, 160, and 200 for various degrees of transparency. The best advice is to experiment with this number combined with the grey on your alpha. You won’t see the results until the object is in your game, so you might find yourself working back and forth between Workshop and game until you find the most ideal settings.
3.5.4. SAVING A MULTIPLIER WITH AN ALPHA
This Multiplier is using an alpha channel so must be saved as DXT5 I Interpolated alpha.

3.6. GLASS
Glass objects don’t use textures at all, so how do you work with glass objects?

We already looked briefly at the Material Editor when looking at Dirt Overlays, and it also popped up in non-recolorable textures and transparency too. To change the effect of our glass, we edit the material directly.
3.6.1. CHOOSING AN OBJECT TO CLONE
Glass is always found in a separate mesh group from the remainder of the mesh, and it’s therefore advisable to clone an object that already has glass inside it. For decorative objects, the atrium fern is a perfect choice. For wall objects, the medicine cabinet has a glass front. And there are plenty of glass lamps and other furniture such as coffee tables with glass too.
Some items currently have no glass-sporting versions (dining tables for example). A planned development of the Workshop will allow us to add additional mesh groups and we hope to be able to add glass and other materials as a result. Until that time, we are limited in being able to add glass to all objects. Changing the material of a mesh that is all in one group will change the entire mesh into glass – usually not ideal!
3.6.2. MAKING GLASS MESHES
Although it’s beyond the scope of this tutorial to talk about making meshes, one detail that is tremendously important for glass is smoothing any hard edges when you want to achieve a curved glass effect.
Below, Shino&KCR provided two examples: the first shows a jar where the glass has not been smoothed. Each hard edge reflects light in a different direction.


The jar on the right however is perfect. The hard edges have been smoothed by welding together all the vertices that make up the curved part of the mesh.
3.6.3. MAPPING GLASS MESHES

Here is a map of the glass group of EA’s atrium fern shown above.

The first thing you can see is that the glass has no special area on the Multiplier. This is because glass does not use the textures we have created for the rest of the object. Size of the mapping is also immaterial.
The atrium’s glass is slapped right on top of the image, but it will make no difference.
The second thing you’ll notice is that all four atrium sides are overlapping; however, the curved glass sits in a separate space from the flat sides.
Overlapping glass on UV maps
Where the glass reflectivity will be different, you must map the glass parts separately, just as EA mapped the curved glass separately from the straight faces. Shino&KCR shows us what happens if we don’t!
 |
 |
 |
 |
In the left-most glass jar, the glass bottom is mapped over the glass sides. As the glass does not rely on textures, it seems a perfectly reasonable thing to do, but if you look closely, the reflection uneven and lacks the smoothness a curved reflection should have.
However, for the jar on the right, the glass bottom sits in its own space on the UV map. The game is now able to render reflection of the glass sides correctly, giving a smooth and accurate reflection.
3.6.4. SETTING GLASS PROPERTIES
If you ever created meshes for Sims 2, you will probably be familiar with the Material Definition. This was a file that would allow us to specify transparency, reflection, and color hues of objects over and above the textures we applied directly to the mesh. Like Sims 2, Sims 3 also has a set of material settings. Most of the time, we have little need to change them, but glass uses no textures so this is where we’ll control how glass will look. 
On the Mesh tab of Workshop, identify which of the groups is your glass mesh. Often, it will be Group 1, with Group 2 being the non-glass parts of the mesh.
IMPORTANT! You will need to repeat this for your low level of detail mesh too!
Select the Default material entry (highlighted in green) and click the button with the three dots to open the Material Editor.
3.6.5. CHOOSING THE RIGHT GLASS
Look at the left of the Material Editor window and you should see a drop-down list called the Shader. The shader is a type of material effect we wish to apply to our meshes, with the standard, solid material being Phong.
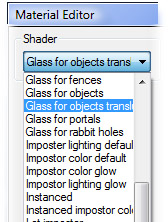
However, there are a number of shaders for glass. There is Glass for fences, Glass for portals (windows and doors), Glass for rabbit holes (the glass we see in community prebuilt buildings – these are actually meshes too!) and finally TWO settings for objects.
The standard glass for objects shader is best suited to low-reflective, opaque glass. The glass for objects translucent shader is better for transparent glass with higher reflective properties. These are the two shaders we commonly use for glass in standard objects that don’t have a special glass shader already provided.
3.6.6. CONTROLLING TRANSPARENCY AND TINT

Click on the Diffuse setting. You can see a drop-down arrow on the right of this line. Click the arrow to open a color pallet. You can see a slider to control amount of transparency (alpha strength) and a color selector to select a tint for your glass.

The more opaque your glass, the more the tint will show.

The effect of tint and transparency will depend on the glass shader you selected. Glass for objects is a better choice than glass for objects translucent for tinted glass.
3.6.7. PERFECT TRANSLUCENCY
Making pure, translucent glass that gives the appearance of solid glass can be tricky. Glass can look too opaque, or too thin, or it can lack any real reflectivity. Therefore, finding good material settings is key.

Shino&KCR have found these settings work particularly well.
- First, choose the Glass for objects translucent shader.
- Change the Diffuse values to zero alpha, and 44, 51, 46 RGB values.
- Reduce Shininess to 10.
- Reduce the Specular down to an RGB value of 190, 190, 190.
- Lower Transparency to 0.5.
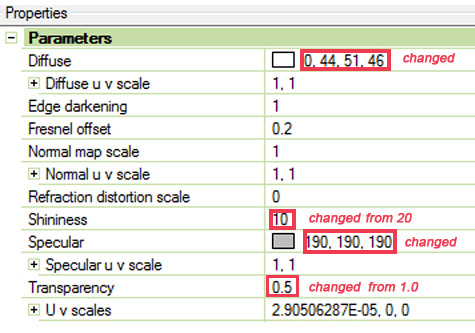
The end result will be a realistic looking thickness of glass with the right amount of reflection.
Remember to make your changes to both HIGH and LOW level of detail meshes!
3.6.8. USING GLASS WITH TEXTURES
Sometimes, the Material Editor will show a Diffuse Map option. A diffuse map will hold color texture that can be combined with glass.
I wanted to make a realistic-looking puddle (and yes, I’m sorry about that picture!). So, I cloned the “clutter magazines,” because these can be walked upon by Sims (and the magazines, unlike rugs, work nicely with glass shaders).

Then, I changed the shader from Phong to Glass for objects translucent and was pleasantly surprised to see this object offered a diffuse map.

I found a water texture (left) and added an alpha channel (middle) to it so that only some of the water ripple would show (right). Since I did not want ripples at the very edges of the puddle as this would not have looked realistic, I set the Alpha Mask Threshold to 20.

4. WORKSHOP
You’ve made all your images. It’s now time to add them to your mesh and see your object spring to life!
4.1. IMPORTING YOUR IMAGES INTO WORKSHOP
Importing the main textures into Workshop is easy! This applies to all the standard textures (Overlay, RGB Mask, Multiplier, and Specular). Special textures are imported in a different way, but we’ll come to these later.

To import any of the main textures:
- Click the TEXTURES tab of Workshop.
- At the top (immediately below the tabs), you will see a drop-down box. This holds all the different texture variations of the original object. To the right of it is the COPY AND MAKE NEW button, which copies your current variation into a new one (a very quick way to make new variations), and a red cross which will delete the currently selected variation.
Using the red cross, delete ALL variations except the first one. - Click on the image (e.g. Multiplier) you want to replace (this will open the Image Editor as pictured).

- Click the IMPORT button (marked with a green arrow).
- Browse for your replacement image.
If you see THIS message, it simply means your images are a different size to the originals.

Click YES, otherwise your patterns will be blurred in the game.
4.2. BROWSING FOR IMAGES ALREADY IN THE PACKAGE
Sometimes you will have imported an image into the Workshop already, and you might want to reuse it. Occasionally, when not concentrating, I have imported a wrong image (for example: importing the RGB Mask into the Multiplier). To correct this, I don’t need to import my Multiplier a second time. I can simply browse for it. The browse facility is also useful when experimenting with different stencils that you’ve imported.
Next to the Import button we were just using is the Browse button.
![]()
Click this to browse through the DDS images already in your file. Only your images are shown. EA’s textures aren’t loaded into the package; they’re loaded from separate database files that hold the library of game textures once your object is in the game.

Select the texture you require from the list and click OK.
4.2.1. REPLACING AN IMAGE WITH AN EMPTY VERSION
If you have cloned an object that already has an Overlay or Stencil that you don’t require, you can replace it with a blank image already in the game. For more information, see: Appendix 2: Replacing images with empty versions.
4.3. CHOOSING PATTERNS
 Now scroll down the screen of the TEXTURES tab and you should see some pattern slots. This is where we do the exciting stuff! First, we need to enable or disable the patterns we need.
4.3.1. ENABLING AND DISABLING PATTERNS
If you only used one RGB Mask color (i.e. your mask is all red), your object will only use the topmost pattern shown here, so change all the other patterns’ Enabled settings to False.
If you used two RGB Mask colors (i.e. your mask uses the red and green channels), your object will only use the first two pattern slots shown here. Ensure these are Enabled: True and change the last pattern’s Enabled setting to False.
If you’ve used all three red, green, and blue colors, then you need all three patterns enabled!
Note: for windows and doors, there is a fourth pattern. This should be enabled too if you used the fourth RGBA color.
4.3.2. PATTERN TILING
Each pattern has a tiling setting. Usually, this should represent how many blocks of 256 x 256 pixels make up your DDS images:
| Image width or height | Tiling value |
| 128 pixels | 0.5 |
| 256 pixels | 1 |
| 512 pixels | 2 |
| 1024 pixels | 4 |
Notice how the tiling of my patterns is 1, 2? That is because my DDS images are 256 pixels (1 tile) wide by 512 pixels (2 tiles) high.
When I said USUALLY above, you might find (especially if you’re new to meshing) that your mapping is making the pattern look stretched. Looking at your object in the 3D viewer on the left, you can experiment with the tiling to see whether a higher or lower number will look better. Once you’re experienced at meshing and UV mapping, you’ll have less need to alter the pattern tiling.
NOTE: THE ROTATION SETTING IS NOT CURRENTLY IN USE.
4.3.3. CHOOSING NEW PATTERNS
Now for the greatest fun of texturing your object: seeing all that hard work coming to fruition!
Click any one of the pattern slots, and an EDIT button appears. Click this EDIT button.

This opens the Pattern Editor. We only need to look at two things. First, we’ll look at the folder of patterns (marked red). Click it to open.

The pattern browser offers all the patterns available to you from the game. Only EA’s patterns will be listed.
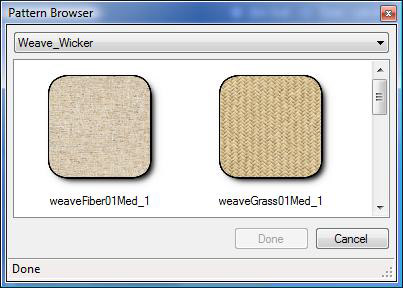
It’s possible to make custom patterns for your objects but that’s beyond the scope of this tutorial. In reality, you won’t need to make your own patterns too frequently because the EA patterns, combined with your images, will do a great job.
The drop-down list allows you to select from all the pattern categories. Choose a pattern for each of the pattern slots you’re using.
Different patterns have different properties of their own. If you left the alpha of your Specular all-black, then the patterns you select will govern whether your object is reflective or not.
4.3.4. EDITING THE PROPERTIES OF A PATTERN
If you expand the Pattern Editor window, you will see at least one HSV Shift drop-down (HSV stands for Hue Saturation Vibrance). There can be up to four color channels in a pattern, though most patterns are only one or two colors. Click any one of these to change the palette colors with a neat little color picker. If you prefer, you can add HSV numbers directly to the number boxes below the color picker instead.
Also, notice the 3D Preview tick-box under the pattern picture? If your PC isn’t struggling under the weight of the Workshop, you can tick this box and see your changes take immediate effect on your mesh in the 3D viewer!
Here is an example pattern comprising three HSV colors you can customize.

4.4. MAKING A NEW COLOUR VARIATION OF YOUR OBJECT
Once your DDS images have been imported and your patterns have been adjusted, you can make a copy of all these settings in order to make new texture variations. Making variations is a good idea because not all players like using the Create-A-Style Tool, and you will also have ideas of your own for how your mesh will appear in the game. I always like to make 2-3 variations at least.

To make a new color variation, simply click the button next to the list of texture variations.
This will make an exact copy of everything you did in your first variation. Your DDS images are already loaded, and so all you need to do is select some new patterns to complete this variation!
4.5. THE FINAL COMPLATE (AND A BONUS TEXTURE FOR SIMS 2 TOO!)
 You’ve finished your texturing, and your object is ready for the game. However, if you’re interested in seeing the complate (texture map) that you have created for each pattern variation, go to the Textures tab, and click on the small floppy-disk icon as shown below.

Select the Diffuse Map option, and save in your chosen format of DDS, JPG, bitmap, etc. There will be a Complate for every texture variation you’ve made.

This is a great way to make a Sims 2 version of object textures, too!
4.6. SAVING AND EXPORTING YOUR NEW OBJECT
If your meshes are imported, your shadows done, your categories on the PROJECT tab are ticked correctly and you’ve finished your textures and pattern selections too, then , then you’re ready to export your new object! Here’s a quick Workshop check-list to ensure you’ve finished.
Project tab
- Object, title, description and price are correct
- Correct catalog categories ticked
Mesh tab
- High detail mesh imported
- Low detail mesh imported
- Shadow meshes for high and low detail created
Textures tab
- Textures imported
- Patterns correct and enabled/disabled as required)
- Pattern tiling correct for your image sizes
Misc tab (doors, arches and windows)
- All wall masks changed
3D view of your mesh
- Give your mesh a whirl – check all sides look fine
Click the File menu and SAVE your Workshop file.
Click the File menu again, and export your brand new Sims3Pack object ready for installing into the game!

APPENDICES
APPENDIX 1: ALPHA TROUBLES? A SOLUTION FOR EVERYONE!
The majority of graphics programs don’t have very visible ways of working with Alpha Channels. Photoshop is easy and straight-forward, but the other primary programs differ greatly in how they handle Alphas, and some programs won’t let you create an all-black Alpha at all (a frequent requirement for Speculars).
However, if you’re still struggling, this method, tested in Photoshop Elements and various versions of Paint Shop Pro, has proved a simple and failsafe way to make simple Alphas for your standard DDS images (unfortunately, greyscale alphas will not be possible using these methods, but greyscale alphas are only used on transparencies and dirt overlays.
TO MAKE AN ALL-WHITE ALPHA
- Select your entire image.
- Go to your Selections menu.
- Save your selection to an alpha channel (most programs offer an alpha channel as a selection save option).
TO MAKE A PARTIALLY-WHITE ALPHA
- Select only the parts of the image you wish to add to your alpha.
- Go to your Selections menu.
- Save your selection to an alpha channel (most programs the alpha channel as a selection save option).
TO MAKE AN ALL-BLACK ALPHA (A WORKAROUND)
- Select a very tiny part of your image that is not being used (a small piece of black backdrop in one corner, for example).
- Go to your Selections menu.
- Save your selection to an alpha channel (most programs offer an alpha channel as a selection save option).
Although this alpha isn’t truly black, the tiny white fragment will be in a place where it won’t make any difference to your object, and so is as good as an all-black alpha.
APPENDIX 2: REPLACING IMAGES WITH EMPTY VERSIONS
You can remove unwanted Overlays and Stencils from any object you clone if you don’t need them for your object.
- Click on the image you wish to replace, then click on the EDIT button that appears.
- This opens the Image Editor. Locate the FIND box and button at the top.

- Now copy and paste the following resource number into the text box:
key:00b2d882:00000000:75f8f21e0f143cac. - This will replace your Overlay or Stencil with a link to the game’s internal empty image. Click OK to accept it and close the Image Editor.
- If putting an empty image into a Stencil, don’t forget to change the Enabled setting to False.

IMPORTANT!!
Empty images are much smaller than your Multiplier than other images will be. When asked about updating material sizes, CLICK NO!

RGB Masks
TIP: if your RGB Mask will be one color (red) only, you can replace that with an EA all-red texture instead to further reduce your Sims3Pack’s file size. The key for an all-red RGB Mask is: key:00b2d882:00000000:6f04c03483c744ec
APPENDIX 3: FREQUENTLY ASKED QUESTIONS
My object is totally shiny in the game – what have I done?
In all likelihood, your alpha channel is completely white. Your alpha needs to be totally black except in any places where you want shine. The most frequent cause of white alpha channels is the graphics programs that don’t actually display the alpha channel and therefore you don’t notice what’s happened. You need to redo the alpha for your Specular. See: Appendix 1: Alpha Troubles? A solution for everyone!
I’ve imported my textures but some parts of my object appear white in the 3D view! Why?
You’ve imported an RGB Mask that is using more patterns than the object you cloned. Simply look at the pattern slots and check that those you’re using have been set to Enabled: True.
My patterns are very stretched and blurred – what can I do?
The primary cause of this is poor UV mapping. Imagine your mesh in the game on a floor tile, and consider how big (compared to that entire floor tile) the blurred area appears to be (for example: the seat-cushion part of a dining chair is just a little larger than quarter of a floor tile, so its space on the UV map needs to be at least 128 x 128 pixels (i.e.: quarter of a floor tile). Your mapping needs to be the same sort of proportion of the space the object occupies in the game to be accurately sized. Any less, and the pattern will appear stretched. Read up on DDS sizes for a better understanding.
There is an Overlay I do not require – how do I delete it?
You don’t. Instead, you replace it with an empty image. See the previous Appendix for replacing images with empty versions.
My object appears to be invisible! What have I done?
Check that you have imported your Multiplier correctly. No Multiplier, or a Multiplier in the correct format, will give the appearance of an invisible mesh. Failing that, check that your mesh groups (group_0, group_1 etc match the order of the EA object you cloned.
How can I change a window from 1 to 2 tile or 2 to 1 tile?
Unfortunately, you can’t. You must choose a window that’s exactly she same tile size as the window you intend to make.
My graphics program says “too many layers” – why?
DDS images with alphas need to have a background layer as a minimum. The easiest remedy to this is to flatten (merge) all layers before saving.
Can I make my own patterns for my objects?
Yes indeed, though this is beyond the scope of this guide. Select any of the pattern slots in which you want to load your own pattern, click to open the Pattern Browser and editor, and click the NEW icon at the top to load the Pattern Tool plugin.
Can I convert my Sims 3 textures to Sims 2?
Very easily! Simply export each of your texture variations as a single Complate file (composition of all the DDS images you used) as a PNG file. Your texture is now ready for Sims 2!
I imported my Specular but my mesh still appears to show the reflection of the original EA Specular – have I done something wrong?
No. Sometimes the 3D viewer doesn’t show an update of your new Specular until after you have closed and re-opened your project. However, there’s an even quicker way to update the view – simply re-import your mesh. That triggers a refresh of the viewer and will update the effect of the Specular.
My object is not shiny/transparent in Workshop.
Shine and transparency effects are not all currently shown in the 3D viewer. Check your object in the game to see whether the effect you require has been achieved.