
With the public release of the TSR Workshop, everyone is anxious to get busy making all sorts of custom content. But, if you’re like me and can’t mesh yet but still have that itch to contribute to the community with something wonderful, then this tutorial for creating custom paintings in The Sims 3 might be for you.
Sims 3 Custom Paintings with EA Meshes
I will show you how easy it is to make your very own custom painting by your favorite artist using one of the very lovely frames that already exists in your game.
What You will Need:
- TSR Workshop (8.7 or latest release)
- Graphics editing program (I will be using Photoshop CS3) or the program of your choice.
- DDS plug-ins for Photoshop, current version (installed). http://developer.nvidia.com/object/photoshop_dds_plugins.html). Gimp and Paint Shop Pro also have plug-ins available on the internet.
- Good quality image of your choice or you can use mine. Just right click and save it. But, I do ask that you only use it for tutorial purposes as I’ve already uploaded it for publication on TSR.

I’ll be using one of my favorites, The Waterlily Pond with the Japanese Bridge, 1899 by Claude Monet.
Section 1 – Creating a New Project
We’ll start by opening Workshop (WS) and clicking on Create New Project.

In the Create a new project screen select Object and then click Next.

You will now find yourself on the Object Clone screen. In the Object By Category section on the left, select Décor/Wall Art. You will see workshop display all the paintings in the game. Remember the only paintings available to clone are the ones with a frame. I’ve selected the Painting still life for my painting. Click Next and you’re on your way.

At this point the Project details screen will pop up. Here you will type in your Project Name, Title, and Description. When you are finished with all of your information go ahead and click Next.

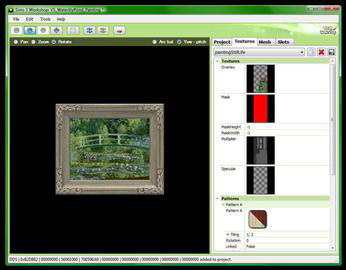
Your project has now been created and we are ready to customize it. As you can see from the screenshot, your project is opened on the Project tab. It’s a good idea to familiarize yourself with all the sections. It’s in this tab where you can change your project name and description if you find any mistakes and in game categories.

When you’re finished with the Project tab go ahead and click on the Textures tab. You will see a dropdown box called Variation. If you click on it you will see exactly that, how many frame variations (colors) this particular mesh has. There are three for the Painting Still Life. Make sure the first one is selected and move on to the next section.

Section 2 – Preparing your images
Click on the overlay section and an Edit button will pop up. Click it!

The Image Editor will then be displayed. Click on the Export button. This will export the original file of the painting.

The Export Texture box will pop up. Save this to either your desktop or somewhere that you will remember. It will save as a .dds file.

Now go to Photoshop or your graphics editing program and open the file you just saved. Hopefully you remember where you put it. It will open the NVIDIA DDS Read Properties box.

You will want to make sure the Load Using Default Sizes radio button is clicked. Click OK.

It will open with a black background but that’s ok, it’s supposed to. Now go ahead at this time and open the image of the painting you are using for your custom painting.

You will need to rotate your image so it is facing in the same direction as the original. So go to Image/Rotate Canvas/90° CCW.

Click on the Rectangular Marquee Tool and select the original painting as I have in the screenshot. We will be checking the size in order to resize your painting image so it will fit perfectly.

After you have it selected perfectly hold down your Ctrl key and hit C (Ctrl + C), then (Ctrl + N) and the New box will pop up. Write down the width and height as you will be using them again in just a minute. Cancel the New box; you will not be using it.

At this time go back to your custom image. We will be preparing it for placement. Go to Layer/Flatten Image and click. This helps to keep your edges smooth when reducing the image size.

Go to Image/Image Size and click. The image size box will pop up.

You will want to make sure the Scale Styles and Constrain Proportions are unchecked. Input the width and height that we wrote down earlier. (152 x 195)

Your image is now the same size as the original painting. Use the Move Tool to drag it over and place it directly on top of the original.

I like to add a little bevel to the painting. It adds a bit of shape and shadow to the edges. Click on the little FX (add a layer style) on the bottom of your layer window on the right side of your screen, then click Bevel and Emboss.

The Layer Style box will pop up. Make sure the Bevel and Emboss box is checked and highlighted. Leave everything as is except the Highlight mode. Click the box and make it black. You will be able to see the change on your painting. It’s very subtle but noticeable in the final product. Click OK and you are done. Your file is ready to save.

Go to the toolbar and click File/Save As.

When the Save As box pops up make sure the Format says D3D/DDS (*.DDS). You can also change the File Name at this time so you can reuse the original image later if you want to make another painting. Click Save at which time the NVIDIA dds Format box will pop up.

Click the drop down box and select DXT5 ARGB 8pp | Interpolated alpha. Then click Save. Again, save this to your desktop or somewhere you will be able to find it.

Section 3 – Importing back to Workshop
Go back to WS. You should still have the Image Editor visible. But, if you don’t, just click the overlay again and the edit button it will pop back up. Now you are going to import your edited file into WS.

So go ahead and click on Import and the Import texture box pops up. Find your edited .dds file and open.

It will replace the original .dds with yours. Click Done.

Vóila you did it!!! YAY! You will see your painting in the first frame variation.

Section 4 – Editing Variations
Now we are going to do the other two variations. Don’t jump ahead as we are going to do this in a different way.
Instead of importing the .dds file again we are going to use the Browse.
First, though, go back to the variation drop down box and select the second variation. You will see your painting revert back to the original, but with a different frame color. Click the overlay again and the Edit button. Now click Browse and the Project Contents box pops up.

You should see four columns Type, GroupID, InstanceID, Second Instance ID. There will be only one item listed. Click on it and it will show your edited .dds file on the right side. Click OK.

You will then be back at the Image Editor window that will be showing your file once again. Click Done.
We do it this way instead of importing because it keeps the size of the package file down.

Now go back and do this section again for the 3rd variation. After the 3rd is completed, click back on the first variation.
Section 5 – Creating your Sims3Pack
Your custom painting is now ready for export to a Sims3Pack. Click on File at the top left and scroll down to Export and make sure you click To Sims3Pack.

The Save As box will pop up and you will need to find your way to the games downloads folder.
With a normal game installation on Windows Vista it will be here: Documents/Electronic Arts/TheSims3/Downloads.

Make sure you type the name of your file in the File Name box and click Save When it has finished, an Export done! box will pop up and click OK.
If you plan on uploading your finished project to TSR you can do this step again but click on To TheSimsResource and will upload it directly to your File Storage on TSR if you have your Subscription info logged in.

Section 6 – Saving your .wrk file
This section is an easy one. It’s just showing you how to save your work. It’s always a good idea to have a folder with each project in it in case you need to edit it or update it at a later time. I move everything from my desktop to a folder for safe keeping.
You can do this at any point during this process but I saved it for last as I hope you made it all the way through my tutorial.
Go to the File at the top left corner of WS and scroll down to Save As the Save As box pops up.

As you can see in the Save as type box it will have workshop project (*.wrk) written. This is correct. Once again pick a place where you will remember or again save to your desktop.
Later if you want to edit your project or if you didn’t finish it, this is the file you will re-open in WS.

So you made it. This is the end!! You can now open The Sims Game Launcher and click on the downloads button. There you will find your painting just waiting to be installed into your game.

After you have installed it and opened your game you will find it in the decorative section. A good way to find it is to find the original Painting Still Life and it should be right next to it.

So I hope you enjoyed learning how to make your own Custom Paintings using EA meshes.
Good Luck, and most importantly, have fun!!
