
The transition from The Sims 2 to The Sims 3 can be a bit jarring and overwhelming at first. Here is a guide of Sims 3 meshing tips and tutorials to help you get started.
UV mapping
UV maps must all fit onto the texture.
Mesh parts should not overlap other parts on your UV map, especially if using baking (see What is baking?).
Scaling each part accurately on your textures now matters greatly; too large or small and the in-game patterns will blur or distort.
Meshing
There are now separate high and low detail meshes that must be made for each object.
Meshes need to be made for sun-shadows too (Workshop can do this for you).
All vertices (with exception of wall/ground shadows) are now assigned to joints (not just animated vertices).
Texturing
There is no “color” texture. This is made by patterns combined with the remaining textures you make.
There are separate shading and highlight/reflections textures.
Full shaders (together with the textures) combine to replace material definitions.
Wall/ground shadows are now mapped to a fixed “shadow atlas” image in the game. You do not draw your own.
Output format
Sims 3‘s content framework is currently designed for Sims3Pack only.
Package files are not recommended.
File sizes are typically larger.
Is it easier?

A good question! Workshop was designed with complete beginners in mind and has a very easy to use interface so this aspect of creating will definitely feel easier for you. Basic creations are as easy to import/export as Sims 2‘s Homecrafter. However, the meshing and texturing aspects really depend on upon two things:
- how you mapped your meshes for Sims 2
- how you textured your creations
If you used precision in mapping Sims 2 creations so every part of your mesh was to scale in the game, and if you carefully hand-painted your textures, you will probably find Sims 3 creating easier because nothing will have changed for you on mapping, and texturing requires no color.
If, however, you didn’t map to scale but would tile your textures over your Sims 2 mesh instead of scaling, or you downloaded pre-made textures from the net to apply to your meshes rather than hand-drawing, Sims 3 creation will appear more difficult at first. More Sims 2 creators appear to fall into the latter category, so you won’t be alone if this applies to you too.
About those file sizes…
With packages holding a minimum 4 textures and with those textures often being larger than they needed to be in Sims 2, file sizes are greater too. An EA plumbing item, laden with dirt textures too, is not going to weigh in at less than 600Kb or thereabouts, and sometimes is much greater for larger objects such as showers (don’t be too surprised by files in the vicinity of 1 MB). Large files do not impact on game performance in Sims 3, but if you intend creating objects for lot builders to use in their uploaded lots under our TSRAA scheme, there are some tips for keeping file sizes down in our Object Creation Part 2: Object Textures tutorial when making objects with multiple dirt textures.
My patterns are very stretched and blurred – why?
The primary cause of this is incorrect UV mapping.
Imagine your mesh in the game on a floor tile (a floor tile measures 256 x 256 pixels), and consider how big (compared to that entire floor tile) each part of your object appears to be.

For example: the seat-cushion part of a dining chair (see image) is just a little larger than quarter of a floor tile, so its space on the UV map needs to be around 128 x 128 pixels (i.e. quarter of a floor tile). Your mapping needs to be the same sort of proportion of the space the object occupies in the game to be accurately sized. Any less, and the pattern will appear stretched and blurred.
Another cause of blurred textures can be incorrect pattern tiling. On the TEXTURES tab, ensure that the “Tiling” value is set correctly. A pattern is 256 x 256 pixels in size, and the tiling values usually represent how many pattern tiles fit onto your image. For example: if your Multiplier is 512 x 512 pixels in size, then that is 2 patterns wide by 2 patterns high. If these values don’t correct the blurring, you can increase or decrease the tiling values until the texture is clear and sharp.
What is UV Mapping?
UV Mapping is a process where every part of a 3-dimensional mesh is laid out flat onto a 2D graphic (known as a texture map) so all faces of each part can be textured individually.
For a simple example, this 3D cube has been laid out flat so that all of its 6 sides can be textured separately.

What are U and V?
The name UV Mapping is derived from the makeshift co-ordinates U and V. Meshes in 3-dimensional space use three co-ordinates: X (for width), Y (for height) and Z (for depth), but height and depth can’t be shown differently on a flat texture so, to avoid confusion, when we refer to vertices on the 2D texture map we use the letters U and V (for example: “line up all vertices along the U axis”). You can see these labels on the above image: U represents horizontal co-ordinates, and V represents vertical co-ordinates.
How do I make my UV map a particular size?
You don’t. Basically, a UV map is proportional: it will shrink or expand to fit any texture size you create for your mesh. The above texture map for the cube would shrink to fit on a postage stamp or a narrow rectangular shape if you created textures of that size. Equally, it would expand and stretch to fit a much larger texture. When you import your mesh into Workshop and then create a multiplier for it, your UV map will stretch or expand to fit your multiplier’s size and shape. For creating the correct size textures, see What size should my DDS textures be?
What tools do I need to make a UV map?
Many 3D programs (see: What programs do I need for meshing and 3D modeling?) have UV mapping (sometimes called texture mapping) built in. Generally, the default shapes are pre-mapped, though how well they have been mapped depends upon the program.
For example, Milkshape maps all sides of a cube to fit the UV map 100% width and height (all faces overlapping on the map) and it maps the tube of cylinders but not the end caps. Often, using a third party program to unwrap your model is the best place to start.
Are there any tutorials here at TSR?
Most mapping tools are accompanied by tutorials (usually hosted at the site offering the tool), but for specific tutoring on mapping your first mesh, see Object Creation Part 1: The Beginner’s Guide To Meshing.
What programs do I need for meshing and 3D modeling?

The one program you WILL need is Milkshape 3D. Milkshape is currently the only 3D program supported by Workshop’s Sims 3 plugins. However, unless you want additional help in UV mapping or more advanced features such as baking or deformers, Milkshape might be the ONLY 3D program you’ll need!
However, the versatility of Milkshape’s import and export options means that you can work with practically any 3D program provided that it offers Milkshape-compatible import and export formats (for example: OBJ, Alias FBX, LWO and 3DS). This gives you the freedom to use almost all available 3D programs (including Poser) provided the program offers common-place import/export formats. For a list of supported formats, see: Can Milkshape read my 3D file format?
Some programs used by Sims creators include:
Free
o Blender (supports baking – see: Baking Shadows)
o Wings 3D
Low price (under $100)
o Milkshape 3D (supports Sims 3 plugins for all tools; expansive import and export options)
Mid price ($100-$999)
o Google Sketchup Pro (only the Pro version supports cross-platform compatible import and export formats)
Premium price ($1000+)
o Autodesk 3DS Max
o Maxxon Cinema 4D
o Autodesk Maya
What should I buy?
Premium packages are expensive and can be many $1000s, so what do you get for your money when it comes to Sims modelling? Surprisingly, the difference is not the final model but the steps you take to achieve the result.
You’ll do everything manually in a low-end product whereas many actions are automated in a high-end product. A skilled modeler will be able to achieve an excellent result in a low end package, but a high-end product does make life easier!
Warning!
The premium products are eye-wateringly expensive and totally beyond the reach of most people, but older versions are sometimes available on sites like eBay. DO check with the seller that the product has a usable license if you buy a pre-owned version.
Other tools
If the 3D program you choose does not automatically ‘unwrap’ your model’s UV map before you start mapping it (for example: Milkshape), then UV Mapper Classic/Pro is a great utility too. The “classic” version is cumbersome to use, but free. The Pro version (recommended) is much more user-friendly with proper UV rotation and mirroring and offers the ability to relax vertices and align the U and V co-ordinates of your map.
What size should my UV maps be?
References:
Object Creation Part 2: Object Textures
Object Creation Part 1: The Beginner’s Guide To Meshing
What size should my DDS textures be?
What is UV Mapping?
There is no definitive size of a UV map. The UV map you create is actually proportional and will scale or shrink to fit any texture you apply to your mesh, whether it’s the size of a postage stamp or a bed sheet!

It’s actually your texture size that determines the size of your UV map. Each part of your mesh must be drawn the correct size on your multiplier to ensure that the in-game pattern is not stretched or blurred. Unless you able to map out in pixel sizes in your 3D program, whilst it’s tempting to map your mesh before making any textures, it is easier and more accurate to map out the sizes of each part of your mesh onto a dummy texture to be sure your UV map is scaled correctly for The Sims 3.
Can Milkshape read my 3D file format?

Below is a list of the more popular Milkshape 3D supported formats. Note that the list of import and export formats differ (for example: Milkshape can only export Collada; there is no import support at this time, and it can only import Maya – no export).
Note that there are also plenty of third-party plugins for Milkshape on the net that are not included in the basic Milkshape build, but the following are those supplied with the Milkshape download.
IMPORT FORMATS
- 3D Studio ASC
- Alias FBX
- Alias FBX (2010)
- ASCII
- AutoCad DXF
- Autodesk 3DS Max
- Gamestudio A5 MDL
- Gamestudio MDL7
- Genesis3D BDY
- Genesis3D PSK/PSA
- Half-Life SMD (works for all SMD files)
- Lightwave LWO
- Lithium Unwrapper LUV
- Maya
- Playstation TMD
- RAW
- Refractor2 SM
- Sims 2 Unimesh OBJx
- SoftImage XSI
- Text
- TSR Workshop WSO
- Wavefront OBJ
- Wavefront OBJ (UV map only)
EXPORT FORMATS
- 3D Studio ASC
- Alias FBX
- ASCII
- ASE
- AutoCAD DFX
- AutoDesk 3DS Max
- Blitz Basic 3D
- DirectX 8.0 file
- DirectX JT
- COLLADA
- GenEdit 3dt exporter
- Generic MAP
- Lightwave LWO
- Lightwave 6.5x LWO
- MCM2 SLT Model exporter
- Nebula Script
- Orbiter Mesh ASCII
- POV-Ray INC
- Q3Radiant MAP
- RAW
- Refractor2
- Renderman RIB
- Scene Description Format
- Sims 2 Unimesh OBJx
- SoftImage dotXSI 3x
- Text
- Torque Game Engine
- TSR Workshop WSO
- Viewpoint Experience Technology
- VRML 1 WRL
- Wavefront OBJ
- Yafray
- Zy’s K-3do exporter
There are a raft of other game-specific plugins supported too. If you cannot see your format named, it’s possible that it’s been linked in Milkshape’s lists as a game-specific plug-in such as Half-Life SMD (which is more widely compatible than Half-Life alone).
Can I convert a window from 1 to 2 tiles (or vice versa)?
No. Window files contain specific wall mask images and placement information that cannot be changed in Workshop. Although it is physically possible to remove the wallmask graphics (and change the footprint and boundary box), the placement information still remains, sometimes with dire consequences! A two-tile window converted to one tile can shunt the wall masks of other windows along the wall!

For doors, windows and arches, you must pick a base object that already matches the number of tiles you require for your object.
DDS Images
What is DDS?
It stands for DirectDraw Surface. It is a format of image that compiles your graphics, including environmental effects like shine and shade), into a single database file. The Sims uses a series of images to make shading and shine, apply fixed graphics and map out how patterns will be used on your objects.
See also: What size should my DDS textures be?
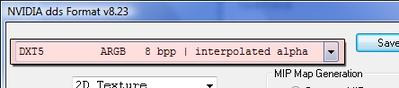
What settings do I choose when saving a DDS image?
Although the interface for DDS can look a little daunting, when saving a texture, you only need to change one setting. In that setting, we only use two of the available options: DXT1 (no alpha) and DXT5 (interpolated alpha).
DXT1 is much more highly compressed (which will result in a smaller file size for your creation) but does not support alpha channels. Therefore, you will typically only use this option when creating Multipliers (without transparency) and RGB Masks (with 3 pattern channels or less).
DXT5 is better quality with the lowest amount of compression, so these images will be larger in file size. This format also supports (and requires) an alpha channel. You will likely use this format most frequently. It is used for overlays, stencils, speculars, 4-pattern RGB masks, multipliers with transparency and wall and counter masks.
Saving your DDS images
As examples, the pink-shaded areas of the following images show where you choose the correct format. These are the only settings you need to change.
Photoshop

Paint Shop Pro

Other Tutorials
Why does my mesh have dark shadows?
What is the maximum polygon/vertex count for objects?
How do I delete a joint in Milkshape?
What programs do I need for creating Sims 3 content?
What graphics programs do I need for patterns and textures?
How do I assign my vertices to joints in Milkshape?